SAP UI 5 Week 4 - Unit 3. QUnit으로 단위 테스트 작성하기
페이지 정보
본문
Week 4 - Unit 3. Writing Unit Tests with QUnit
목차
- 프로젝트에 formatter 추가
- 동작할 수 있도록 만들기
- 단위 테스트 실행
- 외관 다듬기
- 단위 테스트 재실행
- 뷰에서 formatter 사용
1. 프로젝트에 formatter 추가
webapp/model/formatter.js
sap.ui.define([] , function () {
"use strict";
return {
numberUnit : function (sValue) {
…
},
/**
* @public
* Determines a delivery method based on the weight of a product
* @param {string} sMeasure the measure of the weight to be formatted
* @param {integer} iWeight the weight to be formatted
* @returns {string} sValue the delivery method
*/
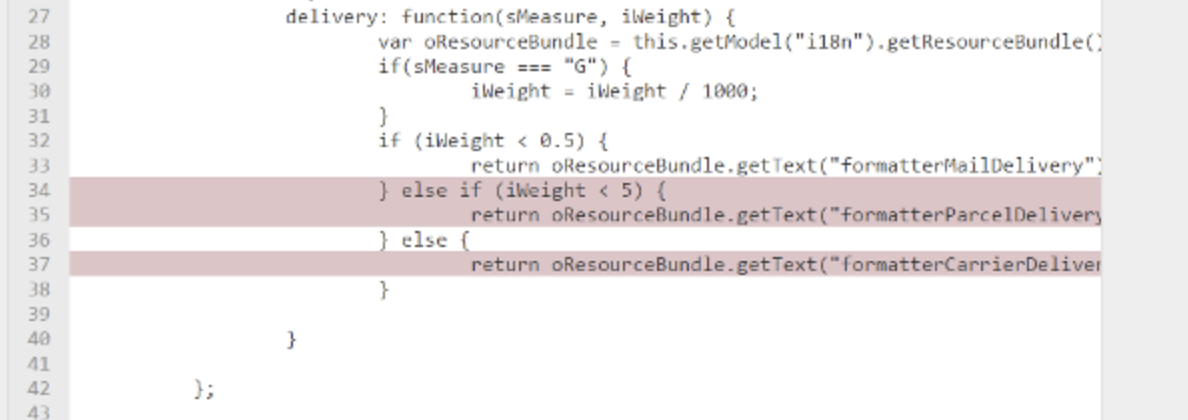
delivery: function(sMeasure, iWeight) {
var oResourceBundle = this.getModel("i18n").getResourceBundle(),
sResult = "";
if(sMeasure === "G") {
iWeight = iWeight / 1000;
}
if (iWeight < 0.5) {
sResult = oResourceBundle.getText("formatterMailDelivery");
} else if (iWeight < 5) {
sResult = oResourceBundle.getText("formatterParcelDelivery");
} else {
sResult = oResourceBundle.getText("formatterCarrierDelivery");
}
return sResult;
},
…
};
}
);
제품 관리 앱 프로젝트에 배송 포맷터를 추가하려면 2주차 2단원 또는 위의 코드에서 포맷터를 복사하세요. JSDoc 문서를 추가하고 코드를 더 짧게 만들기 위해 템플릿에서 사용할 수 있는 BaseController.js 파일에 바로 가기가 있으므로 this.getView() 호출을 제거했습니다.
포맷터는 모델의 제품 무게와 치수를 기준으로 배송 방법(우편, 소포 또는 운송업체)을 결정합니다. 이것은 이 연습에서 단위 테스트를 작성하려는 포맷터(테스트 중인 단위)입니다.
"Make it work, make it nice"라는 패턴을 사용하여 테스트를 작성할 것입니다.
첫 번째 단계에서는 테스트가 성공적으로 작동하고 실행되도록 하고 두 번째 단계에서는 우아하고 유지 관리 가능한 테스트 코드를 작성하고 포맷터의 모든 경로를 다루는 것에 대해 걱정합니다.
이것은 코드를 구조화하고 최소한의 테스트 케이스를 작성하는 데 도움이 됩니다.
2. 동작할 수 있도록 만들기
webapp/test/unit/model/formatter.js
sap.ui.define([
		"opensap/manageproducts/model/formatter",
		"test/unit/helper/FakeI18nModel",
		"sap/ui/thirdparty/sinon",
		"sap/ui/thirdparty/sinon-qunit"
	], function (formatter, FakeI18n) {
		"use strict";

		QUnit.module("Number unit");

		…
		QUnit.test("Should round a zero", function (assert) {
			numberUnitValueTestCase.call(this, assert, "0", "0.00");
		});

		QUnit.module("Delivery");

		QUnit.test("Should determine a delivery method based on the weight of a product", function (assert) {
			var oControllerStub = {
				getModel: sinon.stub().withArgs("i18n").returns(new FakeI18n({
					formatterMailDelivery : "mail"
				}))
			};
			var fnIsolatedFormatter = formatter.delivery.bind(oControllerStub);

			assert.strictEqual(fnIsolatedFormatter("KG", 0.2), "mail");
			assert.strictEqual(fnIsolatedFormatter("G", 200), "mail");
		});
	}
);
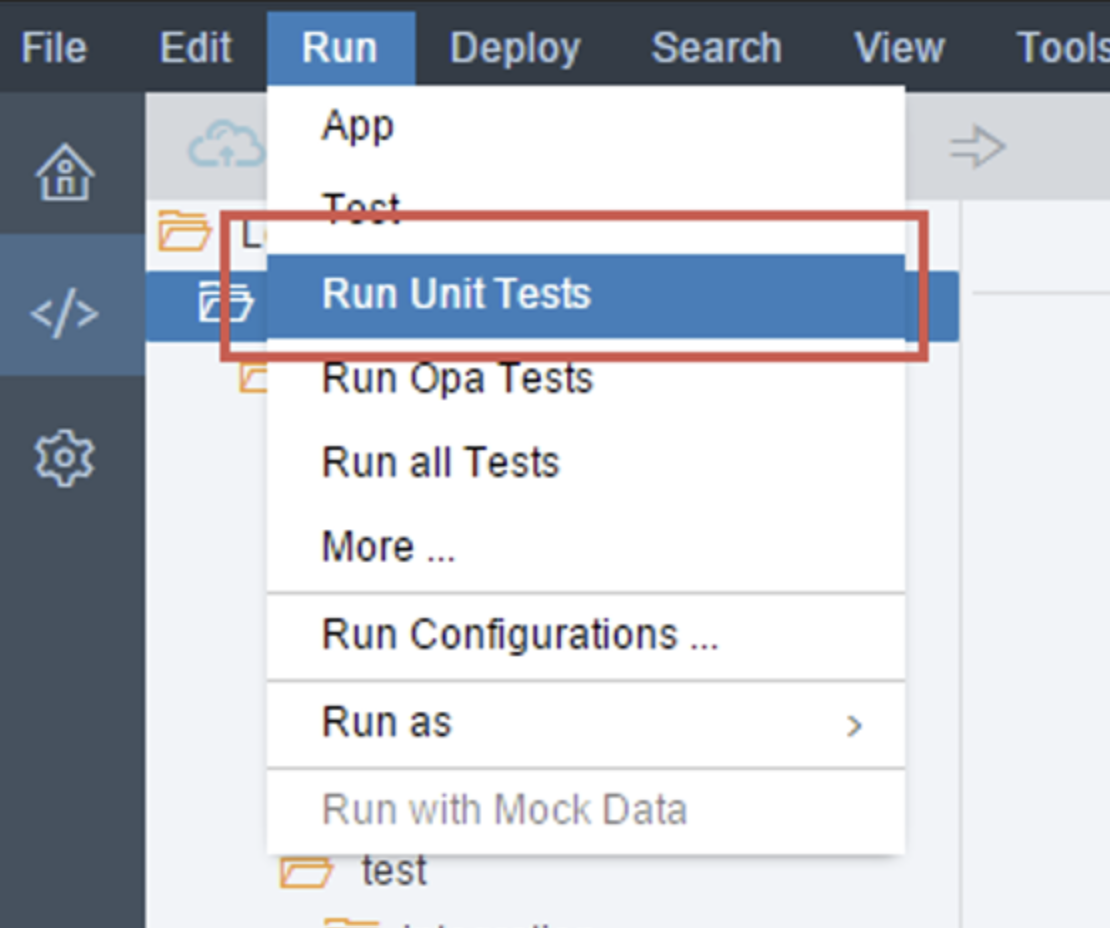
3. 단위 테스트 실행
1."ManageProducts" 프로젝트 폴더를 선택하고 "Run > Unit Tests" 실행 구성을 선택합니다.

2.다른 방법: "unitTests.qunit.html" 파일을 선택하고 파일을 마우스 오른쪽 버튼으로 클릭한 다음 "실행 > 다음으로 실행 > 단위 테스트" 옵션을 선택합니다.
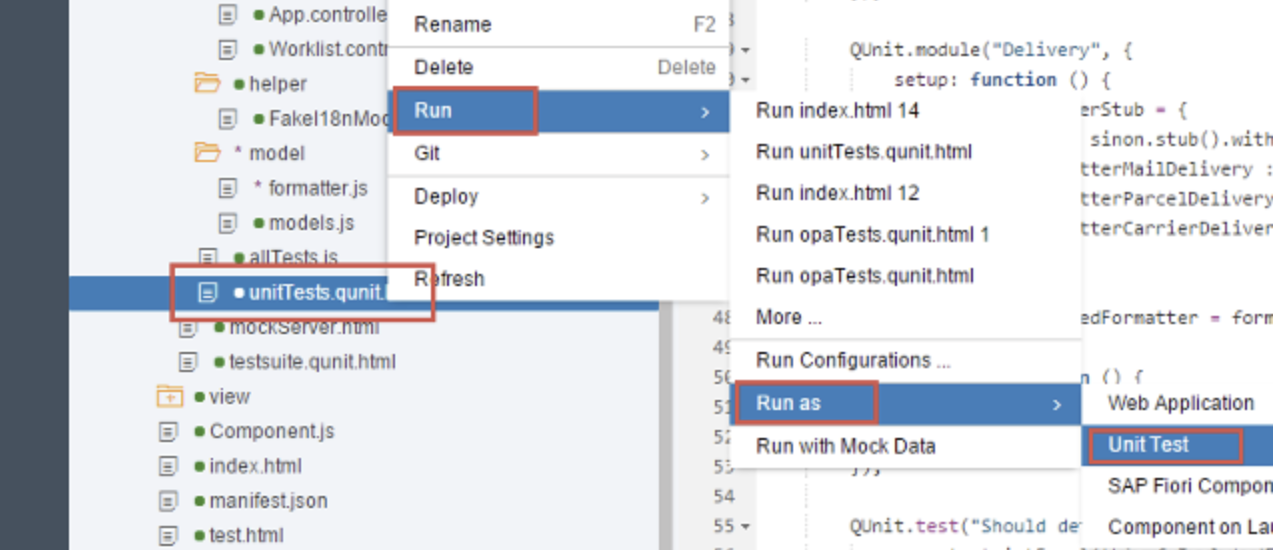
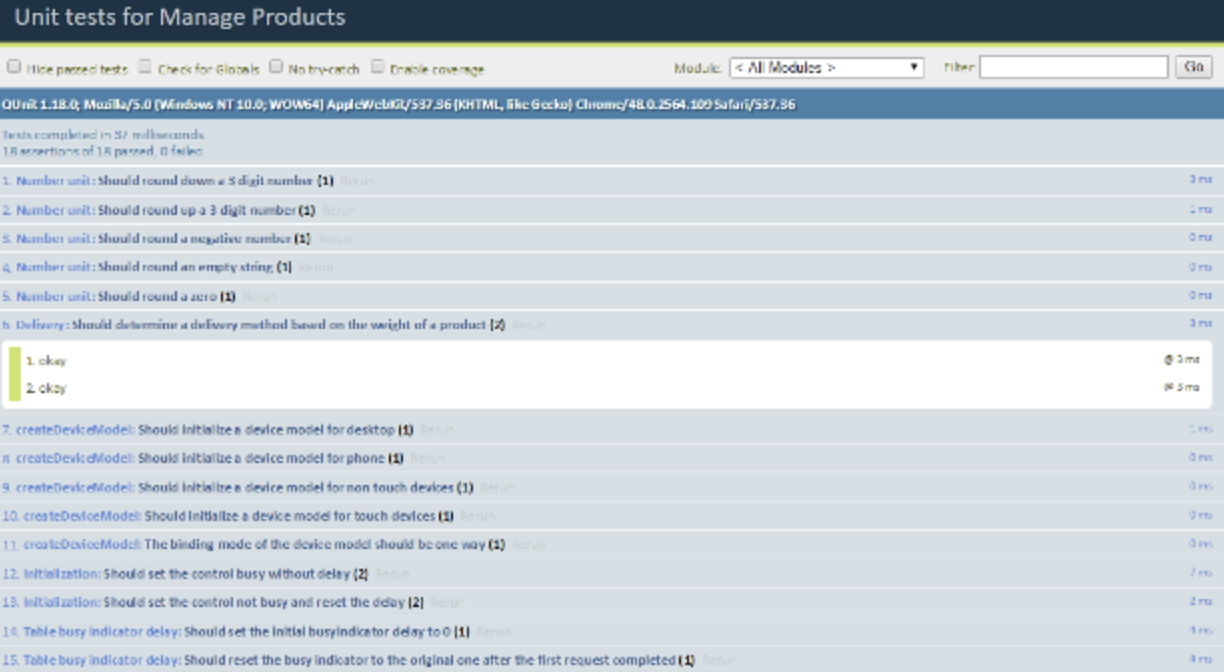
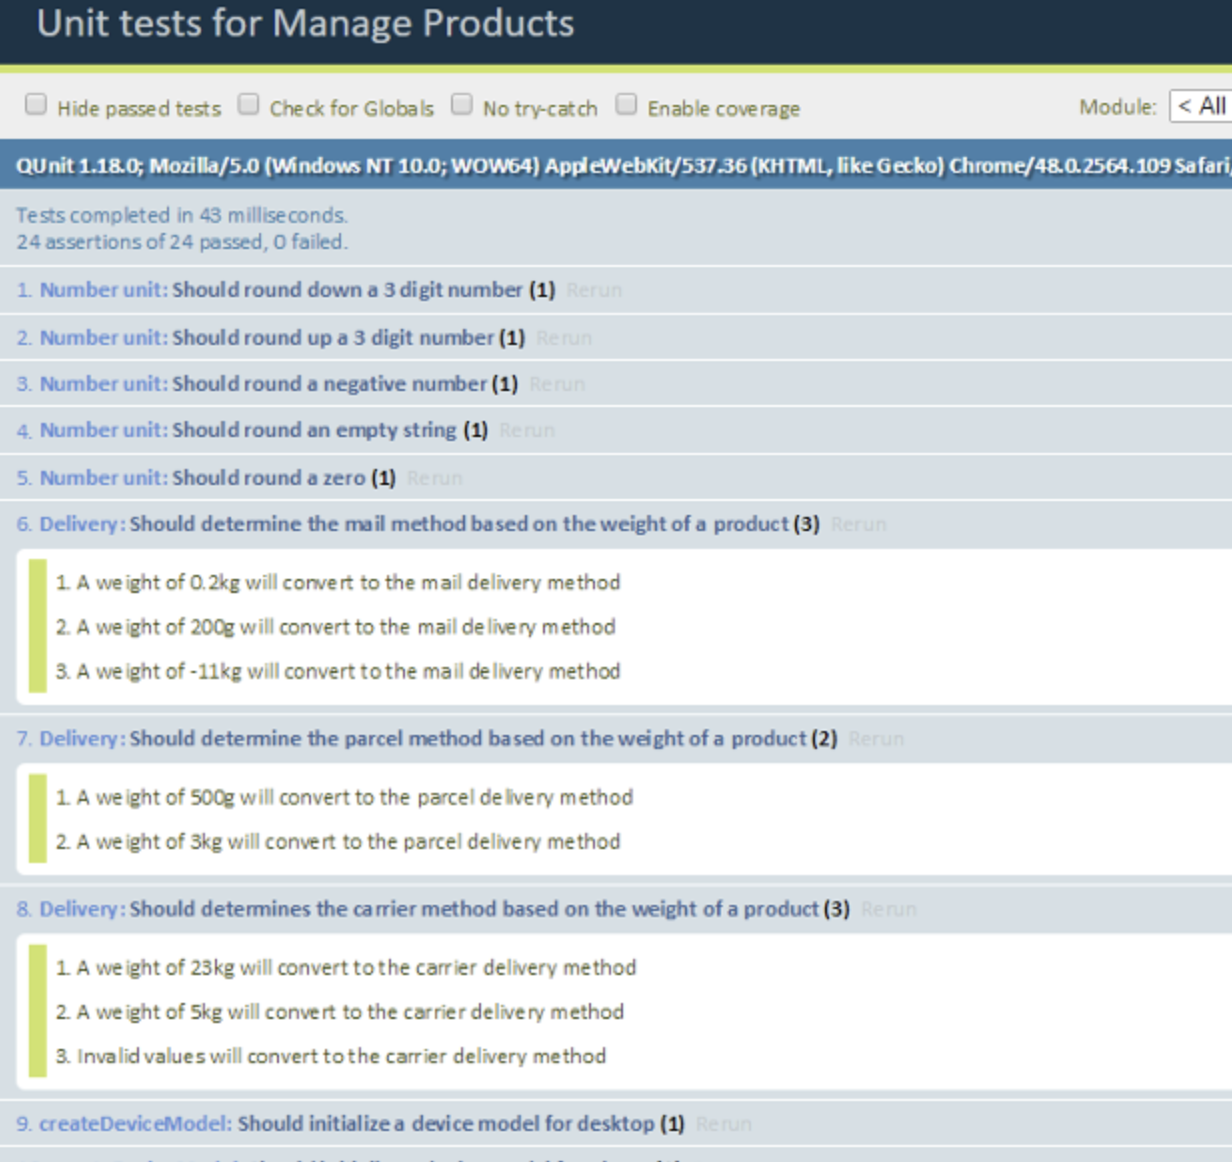
3. 새 창에서 열리는 QUnit 결과 페이지를 확인하고 Delivery formatter 테스트 케이스를 확장합니다.
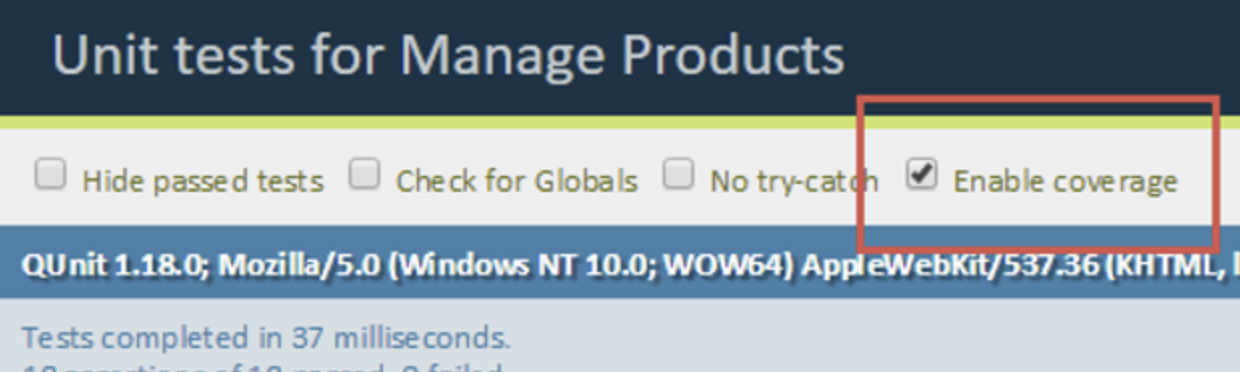
4. "Enable Coverage" 체크박스를 선택하여 테스트의 코드 커버리지 보고서를 표시합니다.
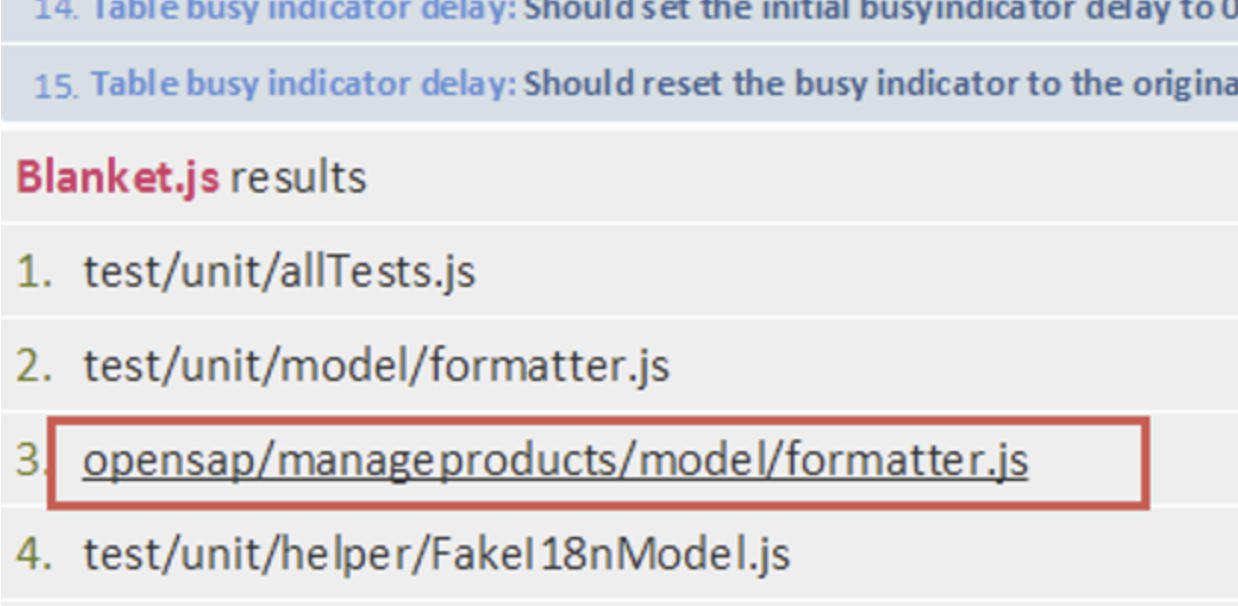
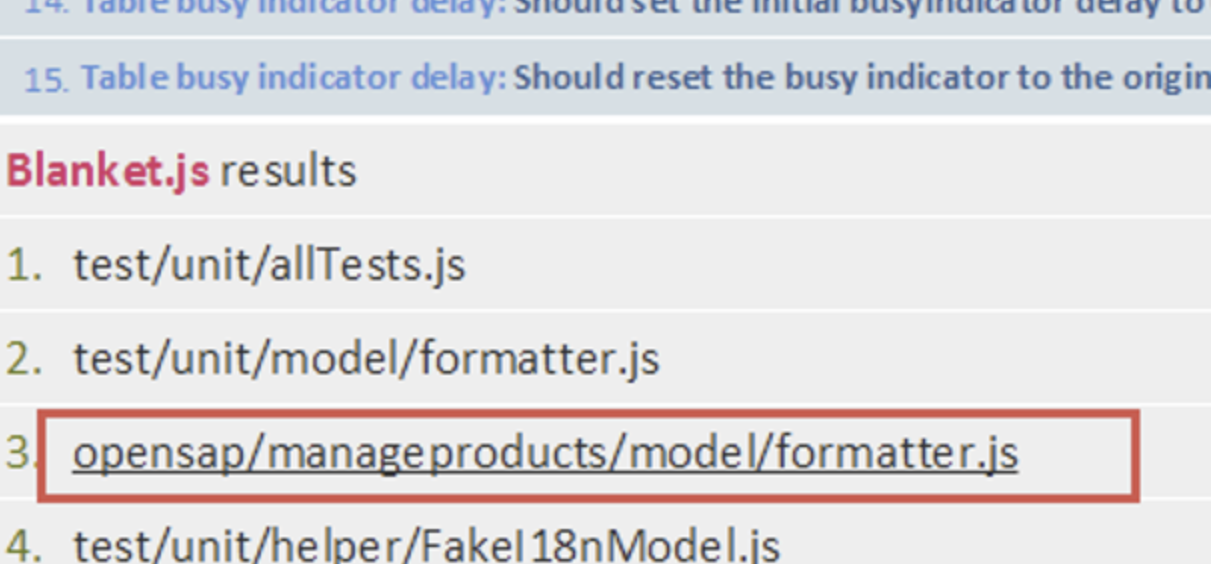
4. 결과 목록에서 포맷터 파일을 클릭합니다.
5. "작동시키기" 섹션에서 아직 다루지 않은 경로가 있습니다. 이제 "멋지게 만들 것"입니다.
4. 외관 다듬기
webapp/test/unit/model/formatter.js
sap.ui.define([
		"opensap/manageproducts/model/formatter",
		"test/unit/helper/FakeI18nModel",
		"sap/ui/thirdparty/sinon",
		"sap/ui/thirdparty/sinon-qunit"
	], function (formatter, FakeI18n) {
		"use strict";

		QUnit.module("Number unit");

		…

		QUnit.module("Delivery", {
			setup: function () {
				var oControllerStub = {
					getModel: sinon.stub().withArgs("i18n").returns(new FakeI18n({
						formatterMailDelivery : "mail",
						formatterParcelDelivery : "parcel",
						formatterCarrierDelivery : "carrier"
					}))
				};
				this.fnIsolatedFormatter = formatter.delivery.bind(oControllerStub);
			},
			teardown: function () {
				this.fnIsolatedFormatter = null;
			}
		});

		QUnit.test("Should determine the mail method based on the weight of a product", function (assert) {
			var oControllerStub = {
				getModel: sinon.stub().withArgs("i18n").returns(new FakeI18n({
					formatterMailDelivery : "mail"
				}))
			};
			var fnIsolatedFormatter = formatter.delivery.bind(oControllerStub);

			assert.strictEqual(this.fnIsolatedFormatter("KG", 0.2), "mail", "A weight of 0.2kg will convert to the mail delivery method");
			assert.strictEqual(this.fnIsolatedFormatter("G", 200), "mail", "A weight of 200g will convert to the mail delivery method");
			assert.strictEqual(this.fnIsolatedFormatter("G", -11), "mail", "A weight of -11kg will convert to the mail delivery method");
		});

		QUnit.test("Should determine the parcel method based on the weight of a product", function (assert) {
			assert.strictEqual(this.fnIsolatedFormatter("G", 500), "parcel", "A weight of 500g will convert to the parcel delivery method");
			assert.strictEqual(this.fnIsolatedFormatter("KG", 3), "parcel", "A weight of 3kg will convert to the parcel delivery method");
		});


		QUnit.test("Should determines the carrier method based on the weight of a product", function (assert) {
			assert.strictEqual(this.fnIsolatedFormatter("KG", 23), "carrier", "A weight of 23kg will convert to the carrier delivery method");
			assert.strictEqual(this.fnIsolatedFormatter("KG", 5), "carrier", "A weight of 5kg will convert to the carrier delivery method");
			assert.strictEqual(this.fnIsolatedFormatter("foo", "bar"), "carrier", "Invalid values will convert to the carrier delivery method");
		});

	}
);
이제 이전에 작성한 단위 테스트를 미세 조정하고 포맷터의 모든 경로를 다룰 차례입니다.
QUnit 모듈은 설정 및 해제 기능이 있는 두 번째 매개변수로 구성 개체를 가져옵니다. 이러한 기능은 각 테스트 전후에 실행됩니다.
포맷터의 모든 논리적인 경로를 다루기 위해 두 개의 추가 QUnit 테스트 케이스를 추가하고 여기에서 소포 및 운송업체 방법을 확인합니다.
5. 단위 테스트 재실행
- "ManageProducts" 프로젝트 폴더를 선택하고 "Run > Unit Tests" 실행 구성을 선택합니다.
2. 새 창에서 열리는 QUnit 결과 페이지를 확인합니다. 현재 3개의 "Delivery" 테스트 케이스가 있으며 각 어설션에는 의미 있는 메시지가 있습니다.
3. "Enable coverage" 체크박스를 선택하여 테스트의 코드 커버리지 보고서를 표시합니다.
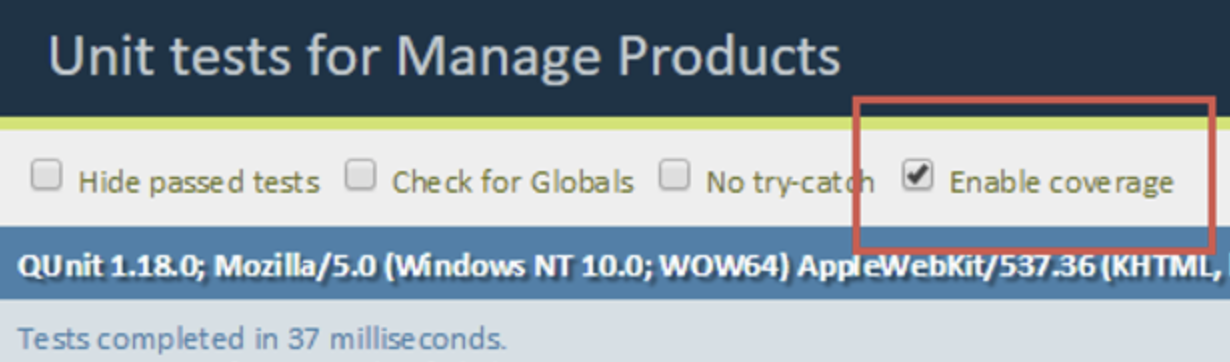
4. 결과 목록에서 포맷터 파일을 클릭합니다.
5. 이제 전달 포맷터에서 100% 테스트 적용 범위를 달성했습니다(포맷터 파일 전체의 경우 93,75%).

6. 뷰에서 formatter 사용
webapp/view/Object.view.xml
<mvc:View …>

	…
			<ObjectHeader …>
				<attributes>
					<ObjectAttribute text="{Name}"/>
				</attributes>
				<statuses>
					<ObjectStatus text="{
						parts: [
							{path: 'WeightUnit'},
							{path: 'WeightMeasure'}
						],
						formatter : '.formatter.delivery'
					}"/>
				</statuses>
			</ObjectHeader>
 		…

</mvc:View>
Object view에서 ObjectHeader의 속성 집계 바로 뒤에 ObjectStatus를 추가합니다. 위의 ObjectStatus 컨트롤을 추가하여 object 페이지에 배송 포맷터를 표시합니다.
webapp/i18n/i18n.properties
#~~~ Worklist View ~~~~~~~~~~~~~~~~~~~~~~~~~~
…

#XTIT: Mail delivery formatter text
formatterMailDelivery=deliver via mail

#XTIT: Parcel delivery formatter text
formatterParcelDelivery=deliver via parcel

#XTIT: Carrier delivery formatter text
formatterCarrierDelivery=deliver via carrier
…
위의 세 텍스트를 추가합니다.
이제 앱을 실행하고 object 페이지로 이동하여 포맷터가 올바르게 표시되는지 확인합니다.
- 이전글1. SAP Work Zone : Overview - 개념 및 구성 요소 21.10.14
- 다음글SAP UI5 Week 4 - Unit 2. 데이터 업데이트 및 다루기 21.10.01
댓글목록
