SAP UI5 Week 4 - Unit 2. 데이터 업데이트 및 다루기
페이지 정보
본문
Week 4 - Unit 2. Updating and Manipulating Data
목차
- 언어 재정의
- Add 뷰 열기
- 데이터 입력 및 저장하기
- 네트워크 추적하기
1.언어 재정의
이 과정에서 사용되는 OData 서비스에는 모든 로그온 언어에서 작동하는 몇 가지 내부 로직이 있습니다. 우리는 언어를 영어로 설정할 것입니다.
1.Run Configuration을 클릭합니다.
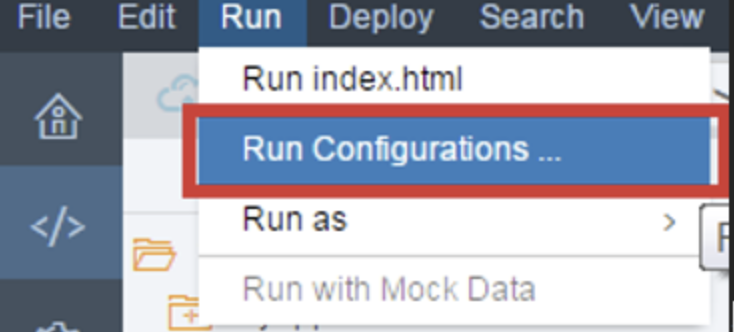
2. run configuration을 선택한 후 사용하고 있는 것을 선택해줍니다. 예) Run APP
3. URL Components 탭으로 이동합니다.
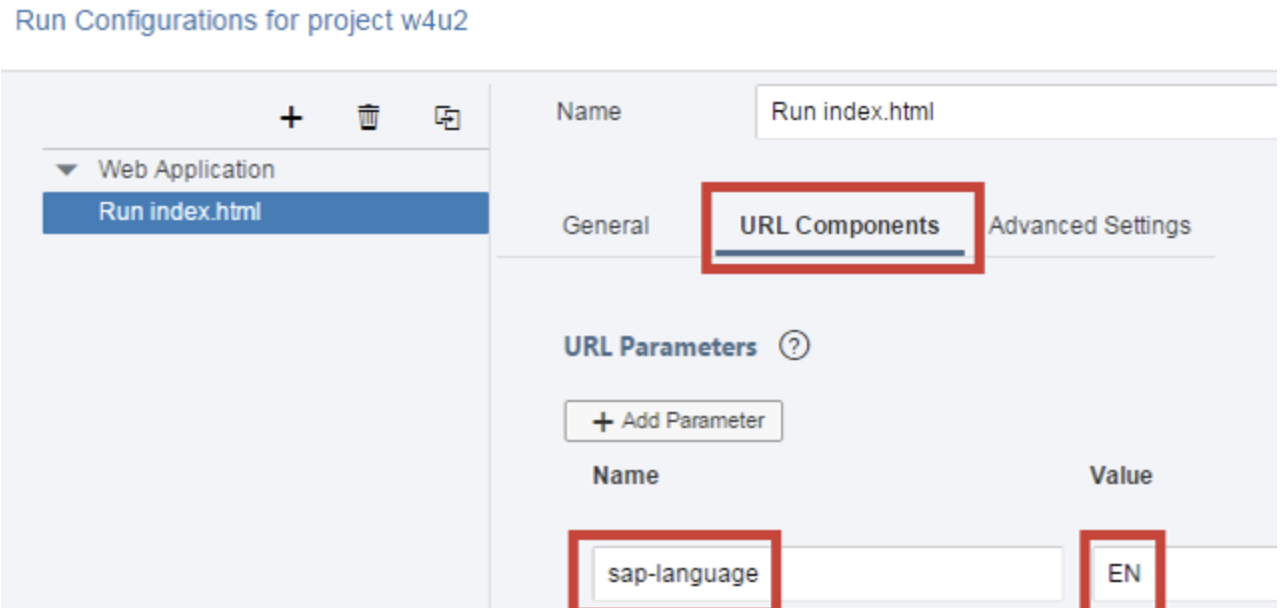
4. sap-language에 이름을 입력합니다.
5. EN을 값으로 입력합니다.
6. 바뀐 내용을 저장합니다.
2.Add 뷰 열기
webapp/i18n/i18n.properties
…
...
#~~~ Add View ~~~~~~~~~~~~~~~~~~~~~~~~~~

#XTIT: Add view title
addPageTitle=New Product

#XTIT: The titel of the form
formTitle=Product Information

#XTIT: The titel of the form group
formGroupLabel=General Information

#YMSG: The not found text is displayed when there was an error loading the resource (404 error)
newObjectCreated=The product {0} has been added

…
우선 새로운 I18N 속성이 많이 필요합니다. 다음에 Add View 섹션에 추가합니다.
webapp/manifest.json
…
	"sap.ui5": {
		…
		"models": {
			…
			"": {
				"dataSource": "mainService",
				"settings": {
					"defaultBindingMode": "TwoWay",
					"metadataUrlParams": {
						"sap-documentation": "heading"
					}
				}
			}
		},
	…
기본적으로 OData 모델은 OneWay 바인딩을 사용하도록 구성됩니다. 즉, 데이터를 표시할 수는 있지만 변경할 수는 없습니다. 뷰에서 모델 데이터를 자동으로 변경할 수 있도록 하려면 기본 바인딩 모드를 2way로 설정합니다.
webapp/controller/Add.controller.js
…

		/* =========================================================== */
		/* event handlers                                              */
		/* =========================================================== */

		_onRouteMatched: function() {

			// register for metadata loaded events
			var oModel = this.getModel();
			oModel.metadataLoaded().then(this._onMetadataLoaded.bind(this));
		},

		_onMetadataLoaded: function () {

			// create default properties
			var oProperties = {
				ProductID: "" + parseInt(Math.random() * 1000000000, 10),
				TypeCode: "PR",
				TaxTarifCode: 1,
				CurrencyCode: "EUR",
				MeasureUnit: "EA"
			};

			// create new entry in the model
			this._oContext = this.getModel().createEntry("/ProductSet", {
				properties: oProperties
			});

			// bind the view to the new entry
			this.getView().setBindingContext(this._oContext);
		},

		…
_onRouteMatched 함수에서 마지막 유닛의 주석을 OData 모델의 metadataLoaded 사용을 약속하는 내용으로 바꿉니다. then 함수는 메타데이터가 로드될 때마다 실행됩니다.
새로운 _onMetadataLoaded 함수에서 oProperties 컬렉션을 만듭니다. 이 컬렉션은 새 개체에 대해 하드 코딩된 속성 집합입니다. 제품 서비스에는 8개의 필수 필드가 있으며 사용자 입력을 요청하지 않고 일부 필드를 기본값으로 지정하려고 합니다. 여기에는 임의의 ProductID 생성이 포함됩니다.
createEntry를 호출한 후 OData 모델은 (a) 메타데이터에 지정된 모든 속성을 포함하고 (b) oProperties로 속성을 기본값으로 설정하는 새 개체를 포함합니다. createEntry 함수는 클라이언트의 모델에만 데이터를 넣지만 아직 서버에서 생성을 요청하지 않습니다.
모델에서 새 항목을 만들 때 대부분의 경우 나중에 서버에 성공적으로 제출될 것이라고 가정합니다. 그러나 이것이 발생하지 않는 두 가지 경우가 있습니다. 사용자가 작업 목록으로 다시 탐색하거나 "Cancel" 버튼을 클릭할 때입니다.
이 경우 새 항목이 모델에 남아 있지 않고 폐기되도록 해야 합니다. 그렇지 않으면 사용자가 이러한 경우 이후에 실제로 새 항목을 제출한 경우 OData 요청에는 이러한 "outdated" 항목도 포함됩니다.
마지막으로 모델의 새 개체를 가리키는 바인딩 컨텍스트에 뷰를 바인딩합니다.
webapp/view/Add.view.xml
<mvc:View
	controllerName="opensap.manageproducts.controller.Add"
	xmlns:mvc="sap.ui.core.mvc"
	xmlns:semantic="sap.m.semantic"
	xmlns:smartfield="sap.ui.comp.smartfield"
	xmlns:smartform="sap.ui.comp.smartform"
	xmlns="sap.m">
	<semantic:FullscreenPage
		id="page"
		title="{i18n>addPageTitle}"
		showNavButton="true"
		navButtonPress="onNavBack">
		<semantic:content>
			<smartform:SmartForm
				id="form"
				editable="true"
				title="{i18n>formTitle}"
				class="sapUiResponsiveMargin">
				<smartform:Group
					id="formGroup"
					label="{i18n>formGroupLabel}">
					<smartform:GroupElement>
						<smartfield:SmartField
							id="nameField"
							value="{Name}"/>
					</smartform:GroupElement>
					<smartform:GroupElement>
						<smartfield:SmartField
							id="categoryField"
							value="{Category}"/>
					</smartform:GroupElement>
					<smartform:GroupElement>
						<smartfield:SmartField
							id="supplierIDField"
							value="{SupplierID}"/>
					</smartform:GroupElement>
					<smartform:GroupElement>
						<smartfield:SmartField
							id="priceField"
							value="{Price}"/>
					</smartform:GroupElement>
				</smartform:Group>
			</smartform:SmartForm>
		</semantic:content>
	</semantic:FullscreenPage>
</mvc:View>
스마트 컨트롤에 대해 두 개의 새 XML 네임스페이스를 추가합니다.
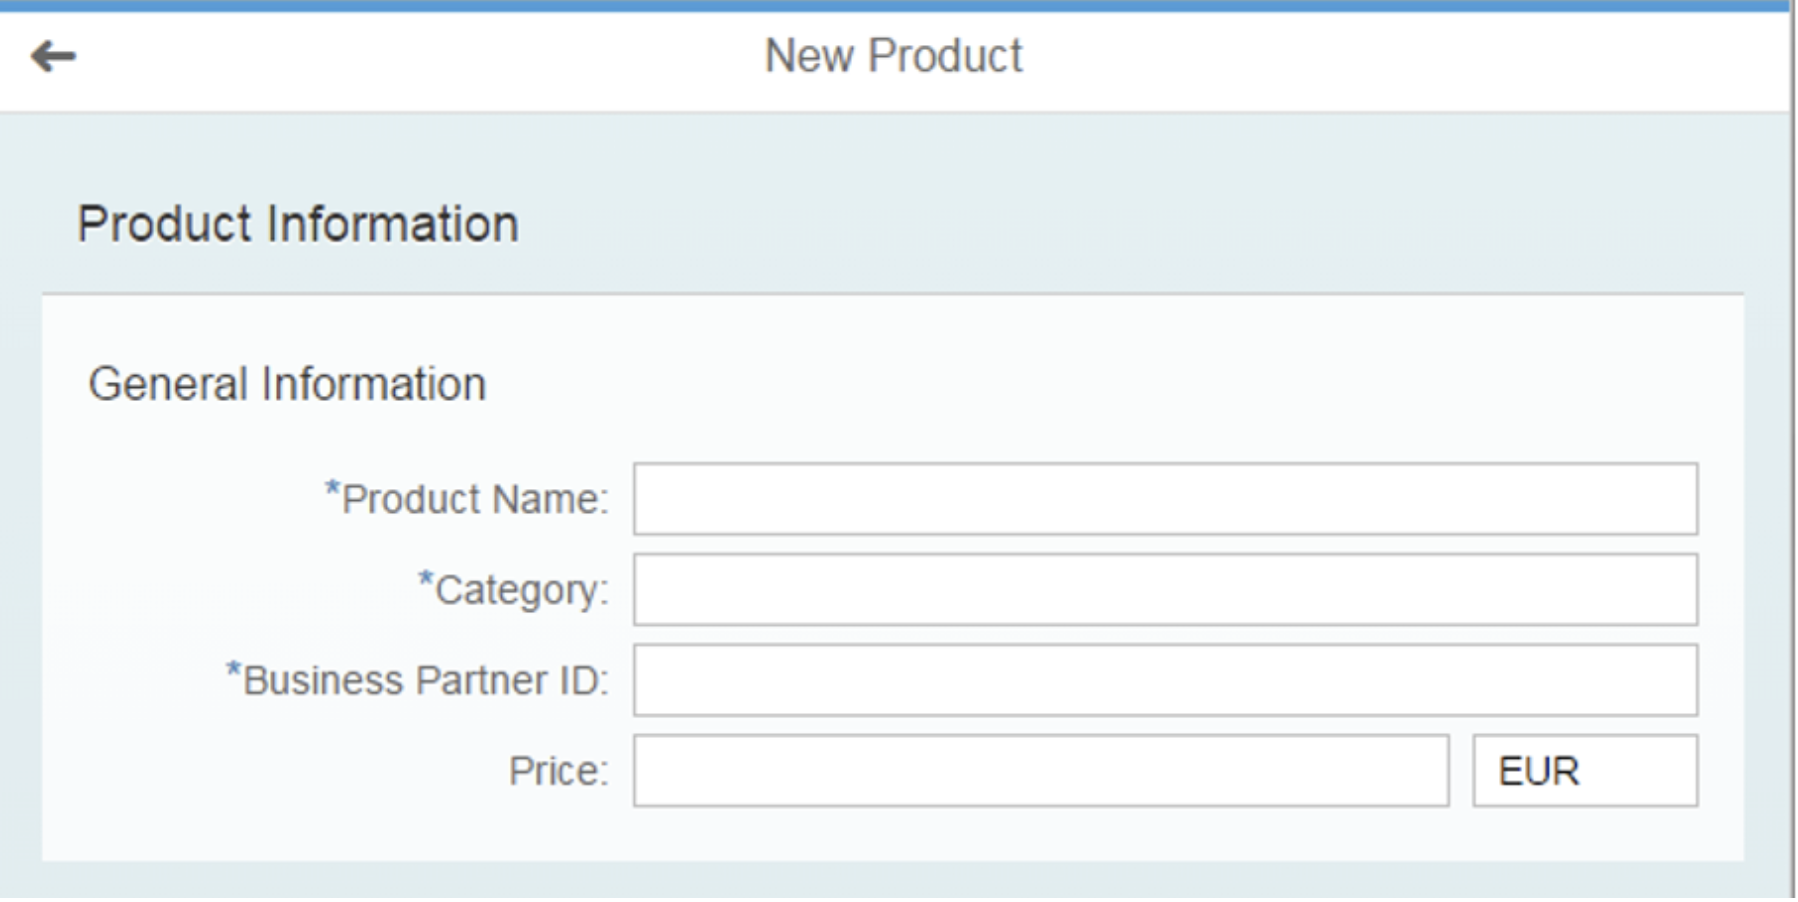
사용자가 항목을 작성할 때 기본값으로 설정되지 않은 제품 속성을 입력할 수 있는 SmartForm을 사용하여 뷰를 확장합니다.
스마트 양식에는 스마트 필드를 포함하는 하나의 그룹이 있습니다. 각 SmartField에 대해 모델 속성에 대한 바인딩만 지정하면 됩니다. 필드 레이블과 같은 기타 정보는 SmartField에서 OData 메타데이터에서 자동으로 읽습니다.
다음으로는 가격 옆에 통화 코드에 대한 추가 입력 필드가 표시되는지 확인합니다.
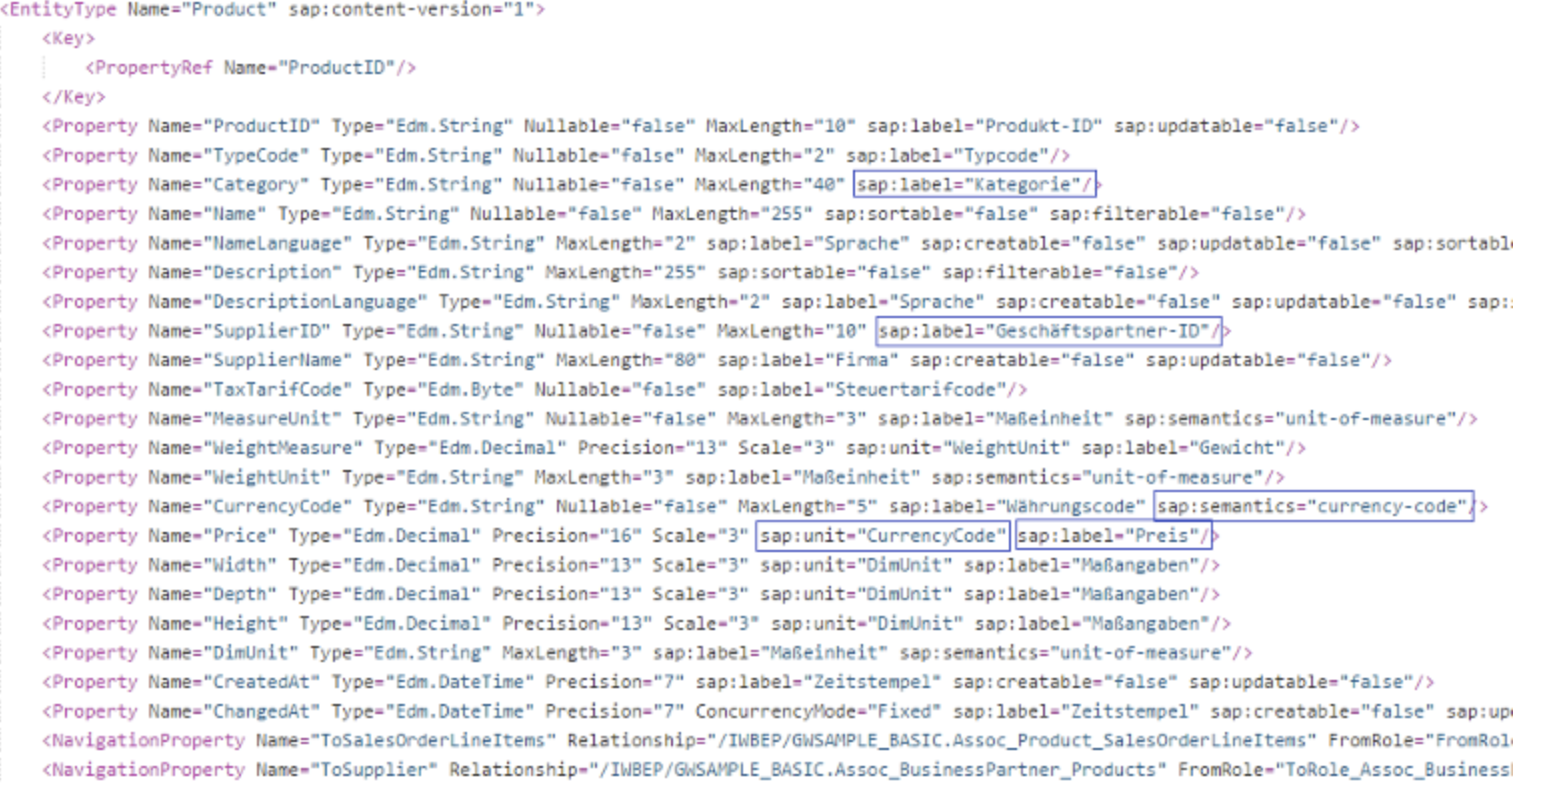
앱에는 백엔드 서비스 인터페이스를 설명하는 메타데이터의 로컬 사본이 파일에 포함되어 있습니다. webapp/localService/metadata.xml을 열고 제품 엔터티를 검색하십시오.
sap:label 주석이 Name, Category, SupplierID 및 Price에 대해 설정되어 있는지 확인하십시오. 또한 sap:unit 주석 CurrencyCode가 가격에 대해 설정되어 있음을 알 수 있습니다. 제품 속성 CurrencyCode에는 sap:semantics 주석도 CurrencyCode로 설정되어 있습니다.
3. 데이터 입력 및 저장하기
webapp/view/Add.view.xml
…
	<semantic:FullscreenPage
		id="page"
		title="{i18n>addPageTitle}"
		showNavButton="true"
		navButtonPress="onNavBack">
		<semantic:content>
			…
		</semantic:content>
		<semantic:saveAction>
			<semantic:SaveAction id="save" press="onSave"/>
		</semantic:saveAction>
		<semantic:cancelAction>
			<semantic:CancelAction id="cancel" press="onCancel"/>
		</semantic:cancelAction>
	</semantic:FullscreenPage>
</mvc:View>
저장 및 취소에 대한 두 가지 추가 작업을 semantic 페이지에 추가합니다.
webapp/controller/Add.controller.js
…

		_onMetadataLoaded: function () {

			…
		},

		/**
		 * Event handler for the cancel action
		 * @public
		 */
		onCancel: function() {
			this.onNavBack();
		},

		/**
		 * Event handler for the save action
		 * @public
		 */
		onSave: function() {
			this.getModel().submitChanges();
		},

		…

		onNavBack: function() {
			// discard new product from model.
			this.getModel().deleteCreatedEntry(this._oContext);

			var oHistory = History.getInstance(),
				sPreviousHash = oHistory.getPreviousHash();

		…
취소 작업에 대한 이벤트 핸들러를 구현하려면 기존 이벤트 핸들러를 호출하기만 하면 됩니다.
OData 모델의 SubmitChanges 기능을 호출하여 Save 액션에 대한 이벤트 핸들러를 구현합니다. 그러면 OData 모델은 변경된 모든 데이터에 대한 HTTP 요청을 서버로 보냅니다.
새 항목이 서버에 제출되지 않은 경우, OData 모델에서 deleteCreatedEntry를 호출하고 메타데이터 Loaded에서 기억하는 바인딩 컨텍스트를 전달하여 NavBack 이벤트 처리기에서 해당 항목을 삭제합니다.
webapp/controller/Add.controller.js
sap.ui.define([
"opensap/manageproducts/controller/BaseController",
"sap/ui/core/routing/History",
"sap/m/MessageToast"
], function(BaseController, History, MessageToast) {
"use strict";
…
_onMetadataLoaded: function () {
// create default properties
var oProperties = {
ProductID: "" + parseInt(Math.random() * 1000000000, 10),
TypeCode: "PR",
TaxTarifCode: 1,
CurrencyCode: "EUR",
MeasureUnit: "EA"
};
// create new entry in the model
var oContext = this.getModel().createEntry("/ProductSet", {
properties: oProperties,
success: this._onCreateSuccess.bind(this)
});
// bind the view to the new entry
this.getView().setBindingContext(this._oContext);
},
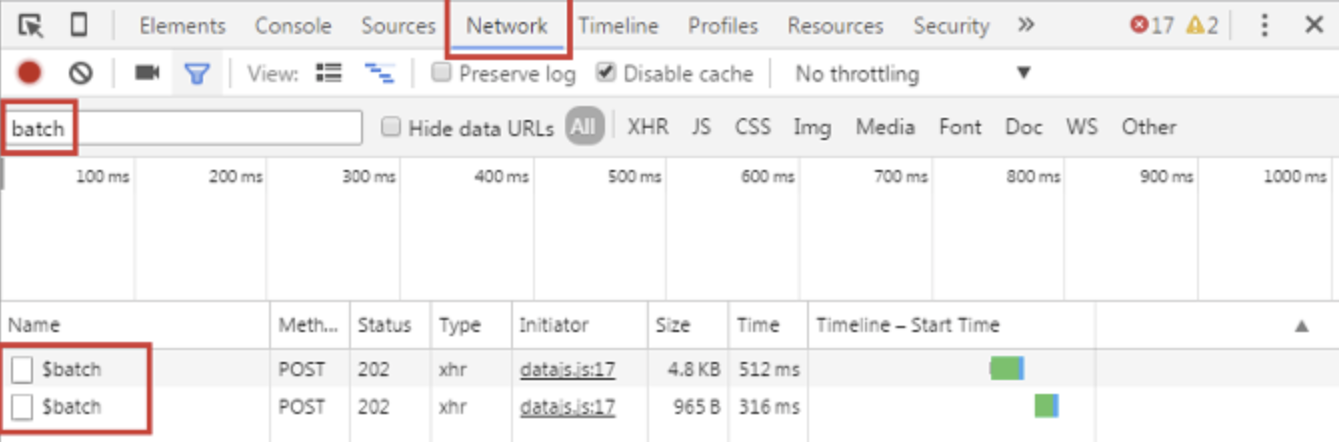
_onCreateSuccess: function (oProduct) {
// navigate to the new product's object view
var sId = oProduct.ProductID;
this.getRouter().navTo("object", {
objectId : sId
}, true);
// unbind the view to not show this object again
this.getView().unbindObject();
// show success messge
var sMessage = this.getResourceBundle().getText("newObjectCreated", [oProduct.Name]);
MessageToast.show(sMessage, {
closeOnBrowserNavigation : false
});
},
…
서버에서 제품을 성공적으로 생성하려면 onCreateSuccess 콜백을 등록합니다. 모델에서 createEntry를 호출하는 코드에서 이 작업을 수행합니다.
이 콜백에서 완전한 제품 개체를 oProduct 매개변수로 가져옵니다. 라우터에 액세스하고 제품 ID를 매개변수 objectId로 사용하여 개체 경로에 대한 탐색을 트리거합니다. 이 개체를 다시 표시하지 않으려면 보기의 바인딩을 해제합니다.
마지막으로 사용자에게 제품이 성공적으로 생성되었음을 나타내는 MessageToast를 표시합니다. 추가 매개변수 closeOnBrowserNavigation은 사용자가 실제로 볼 수 있도록 탐색 시 자동으로 메시지 알림을 닫도록 라우팅하는 것을 방지합니다.
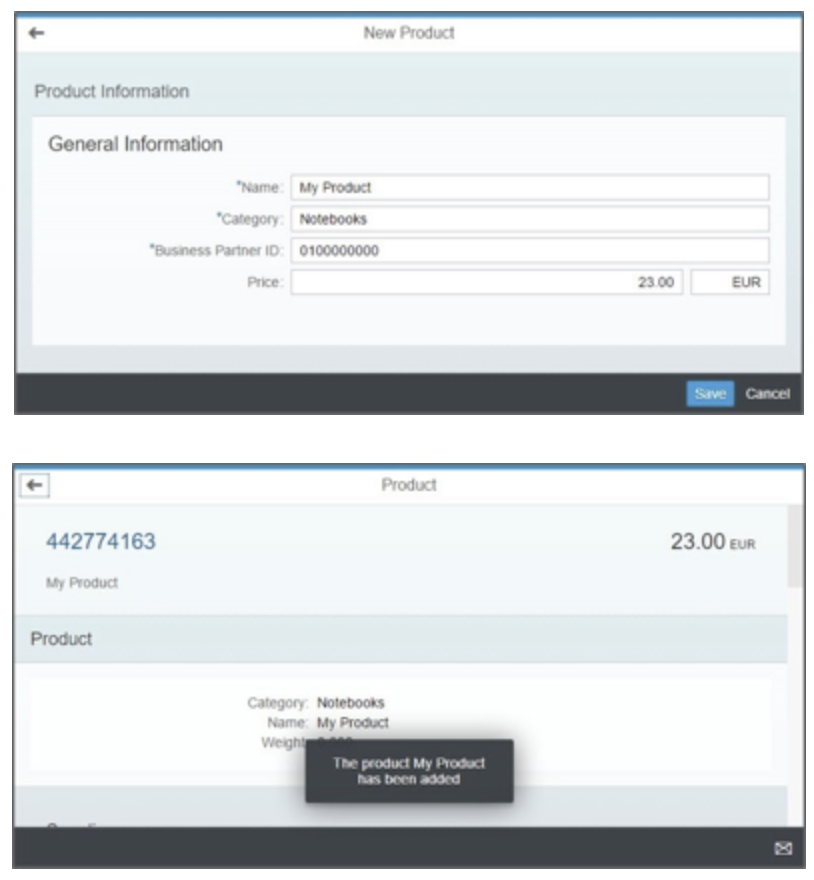
- -앱 실행, 데이터 입력 및 저장
앱을 호출할 때 추가 페이지로 이동하여 다음 값을 입력하여 새 제품을 만듭니다.
• 지정한 이름.
• 카테고리-노트북.
• 비즈니스 파트너 ID로 0100000000.(0, 1, 8개의 0)
• 원하는 가격.
저장을 누르고 새 제품이 생성되었는지 확인합니다.
4. 네트워크 추적하기
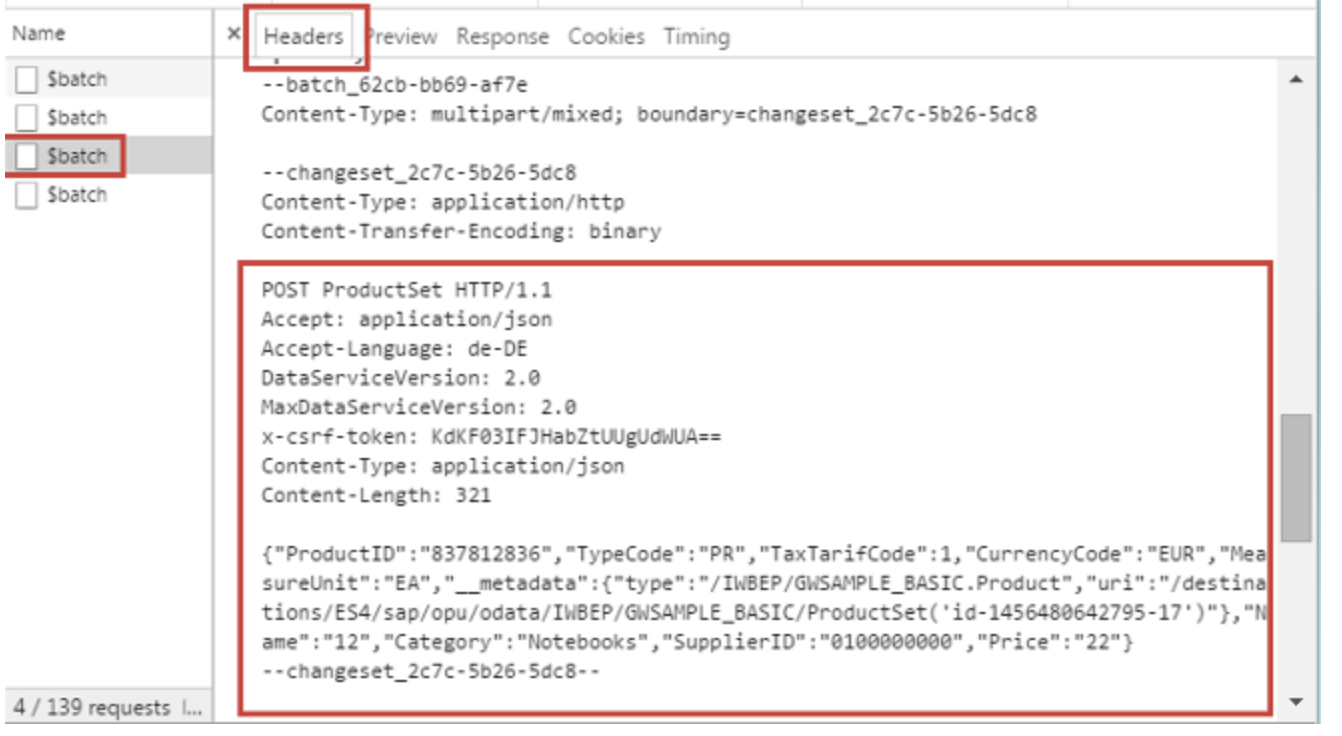
문제를 해결할 때 Chrome 네트워크 추적 기능을 활용하여OData 모델에서 보낸 HTTP 요청을 이해하고 응답의 오류 정보를 분석하는 것이 도움이 됩니다.
1.Chrome에서 앱을 열고 F12를 눌러 개발자 도구를 엽니다.
2. 네트워크 탭으로 전환합니다.
3. 배치를 검색합니다.
4. 이제 요청 목록에는 OData 모델이 보낸 요청만 표시됩니다.
5. 서버에서 제품 생성을 트리거한 요청을 찾습니다. OData 모델에 대해 일괄 처리가 활성화된 경우 헤더에 POST 요청이 포함된 $batch 요청입니다.
- 이전글SAP UI 5 Week 4 - Unit 3. QUnit으로 단위 테스트 작성하기 21.10.01
- 다음글SAP UI5 Week 4 - Unit 1. 네비게이션과 라우팅 컨셉 21.10.01
댓글목록
