SAP UI5 Week 3 - Unit 2. 반응형 테이블 정의하기
페이지 정보
본문
Week 3 - Unit 2. 반응형 테이블 정의하기
목차
- 반응형 테이블 동작 알아보기
- 제품 테이블 및 헤더 업데이트
- 공급업체를 위한 A 컬럼 추가
- 공급업체 웹 주소에 대한 컬럼 추가
- Chrome으로 반응성 테스트
- SAP Web IDE를 통한 반응성 테스트
1.반응형 테이블 동작 알아보기
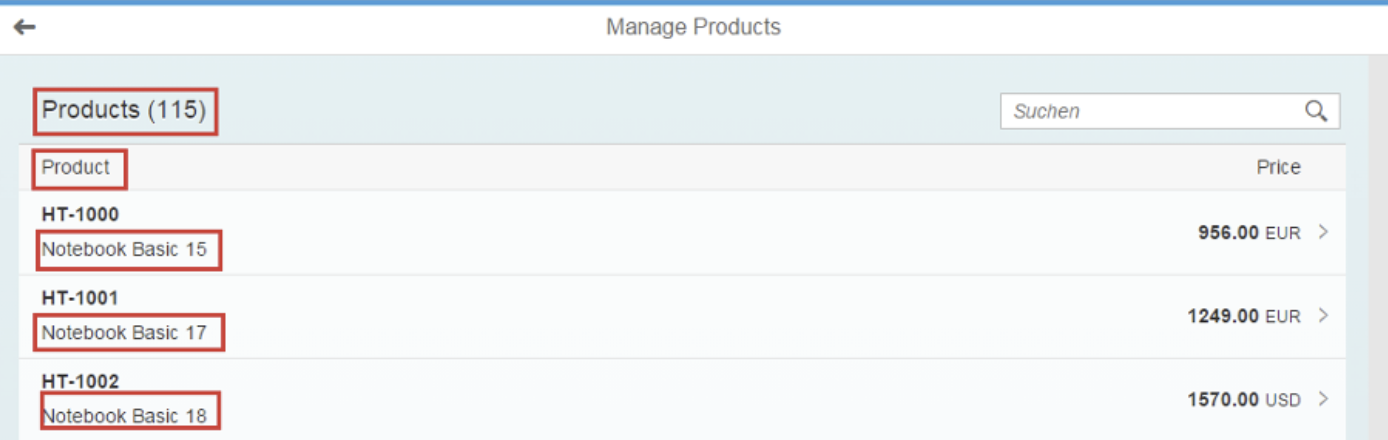
먼저 제품 이름과 제품 공급자에 대한 추가 정보를 포함하여 제품 표시를 개선합니다.
Chrome 및 Web IDE에서 이 환경을 시뮬레이션하며 모바일화면에서의 동작을 테스트합니다.
2. 제품 테이블 및 헤더 업데이트
먼저 제품과 제품 이름을 올바르게 표시하기 위해 생성된 코드를 개선하여 아래의 내용에 대한 부분들을 추가할 것입니다.
Worklist View
• 표 제목 업데이트
• 첫 번째 열 제목 업데이트
• 제품 이름 추가 표시
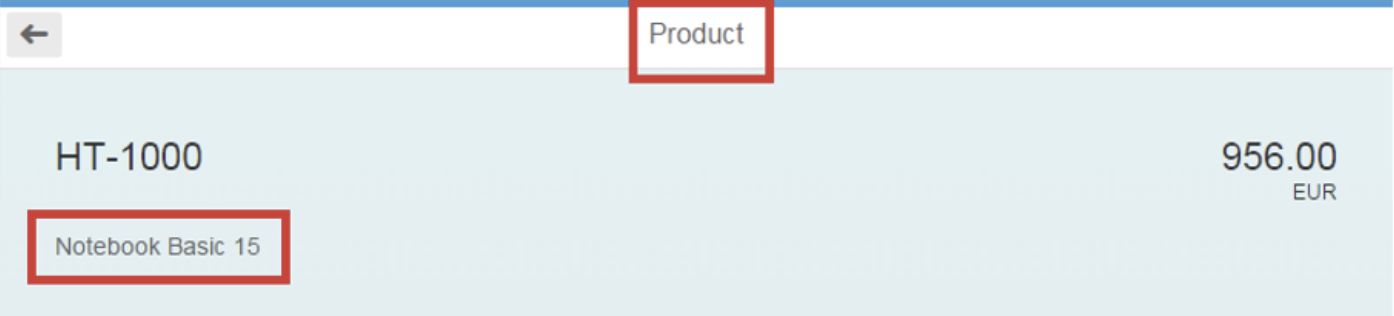
Object View
페이지 제목 업데이트- 이름을 속성으로 표시
webapp/view/Worklist.view.xml
<Table …>
				…
				<items>
					<ColumnListItem
						type="Navigation"
						press="onPress">
						<cells>
							<ObjectIdentifier
								title="{ProductID}"
								text="{Name}"/>
							<ObjectNumber
								number="{
									path: 'Price',
									formatter: '.formatter.numberUnit'
								}"
								unit="{CurrencyCode}"/>
						</cells>
					</ColumnListItem>
				</items>
			</Table>
가장 먼저 테이블의 행을 나타내는 ColumnListItem을 찾습니다.
셀 집계에는 서로 다른 열에 대한 내용을 표시하는 컨트롤이 포함되어 있습니다. 제품 이름에 바인딩된 텍스트를 사용하여 첫 번째 컨트롤(ObjectIdentifer)을 확장합니다.
webapp/view/Object.view.xml
<ObjectHeader
				id="objectHeader"
				title="{ProductID}"
				number="{
							path: 'Price',
							formatter: '.formatter.numberUnit'
				}"
				numberUnit="{CurrencyCode}">
				<attributes>
					<ObjectAttribute text="{Name}"/>
				</attributes>
			</ObjectHeader>
ObjectAttribute 컨트롤을 ObjectHeader의 특성 집계에 추가하고 Name 속성에 바인딩합니다.
webapp/i18n/ i18n.properties
…
#~~~ Worklist View ~~~~~~~~~~~~~~~~~~~~~~~~~~
#XTIT: Table view title
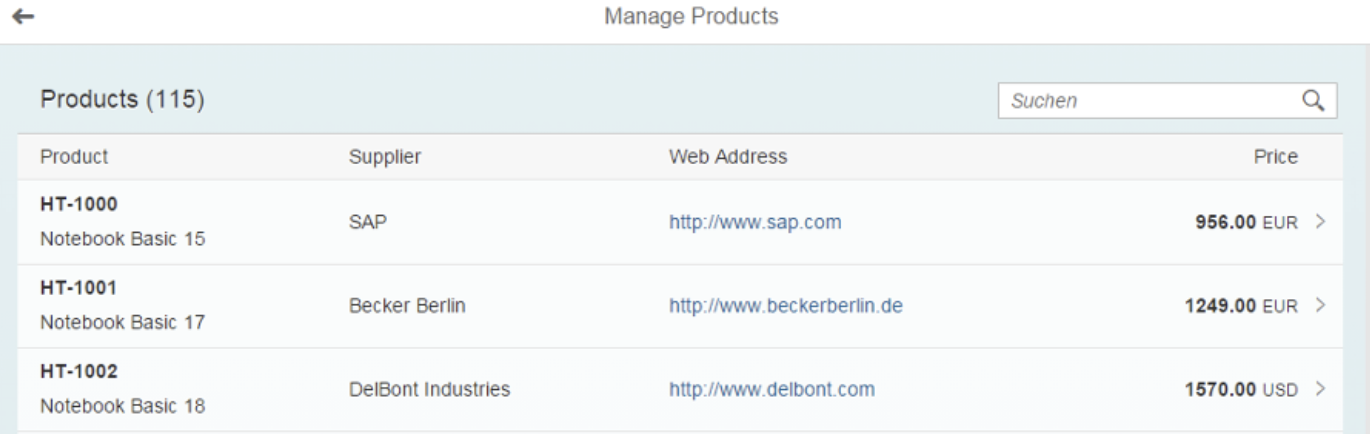
worklistViewTitle=Manage Products
#XTIT: Table view title
worklistTableTitle=Products
#XTOL: Tooltip for the search field
worklistSearchTooltip=Enter a product name or a part of it.
#XBLI: text for a table with no data with filter or search
worklistNoDataWithSearchText=No matching products found
#XTIT: Table view title with placeholder for the number of items
worklistTableTitleCount=Products ({0})
#XTIT: The title of the column containing the ProductID of ProductSet
tableNameColumnTitle=Product
#XTIT: The title of the column containing the Price and the unit of measure
tableUnitNumberColumnTitle=Price
#XBLI: text for a table with no data
tableNoDataText=No products are currently available
…
#~~~ Object View ~~~~~~~~~~~~~~~~~~~~~~~~~~
#XTIT: Object view title
objectTitle=Product
…
#~~~ Not Found View ~~~~~~~~~~~~~~~~~~~~~~~
#YMSG: The ProductSet not found text is displayed when there is no ProductSet with this id
noObjectFoundText=This Product is not available
#YMSG: The ProductSet not available text is displayed when there is no data when starting the app
noObjectsAvailableText=No Products are currently available
서비스 메타데이터를 기반으로 템플릿에서 생성된 기존 i18n 속성을 읽기 쉬운 값으로 업데이트합니다.
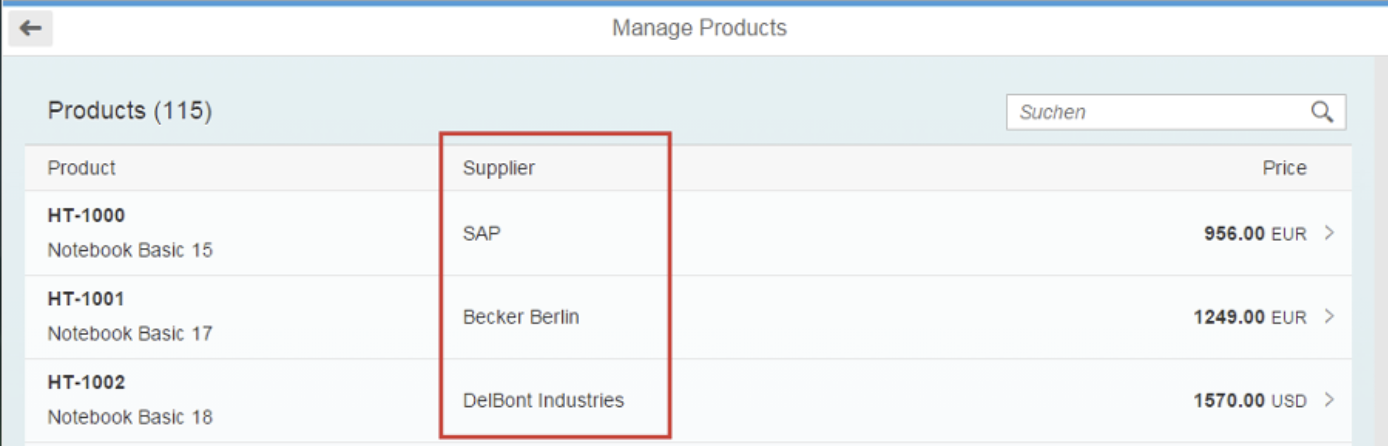
3. 공급업체를 위한 A 컬럼 추가
제품의 공급업체를 보여주는 새로운 컬럼을 추가합니다.
webapp/view/Worklist.view.xml
<Table … >
				…
				<columns>
					<Column id="nameColumn">
						<Text text="{i18n>tableNameColumnTitle}" id="…"/>
					</Column>
					<Column
						id="supplierNameColumn"
						demandPopin="true"
						minScreenWidth="Tablet">
						<Text text="{i18n>tableSupplierColumnTitle}"/>
					</Column>
					<Column id="unitNumberColumn" hAlign="End">
						<Text text="{i18n>tableUnitNumberColumnTitle}" id="…"/>
					</Column>
				</columns>

				<items>
					<ColumnListItem
						type="Navigation"
						press="onPress">
						<cells>
							<ObjectIdentifier
								title="{ProductID}"
								text="{Name}"/>
							<Text text="{SupplierName}"/>
							<ObjectNumber
								number="{
									path: 'Price',
									formatter: '.formatter.numberUnit'
								}"
								unit="{CurrencyCode}"/>
						</cells>
					</ColumnListItem>
				</items>
			</Table>
기존 두 컬럼 사이에 새 컬럼을 추가합니다.
- 컬럼 컨트롤에는 컬럼 헤더를 렌더링하는 데 사용되는 텍스트 컨트롤에 대한 집합들이 있습니다.
- minScreenWidth를 태블릿으로 설정하면 열이 태블릿 또는 더 큰 화면에만 표시된다는 것을 나타냅니다.
- demandPopin은 컬럼이 표시되지 않을 경우 셀을 제자리에 표시합니다.
- 기존 두 셀 사이에 새 텍스트 컨트롤을 추가하고 공급업체 이름에 바인딩합니다.
webapp/i18n/ i18n.properties
…

#~~~ Worklist View ~~~~~~~~~~~~~~~~~~~~~~~~~~

…

#XTIT: The title of the column containing the ProductID of ProductSet
tableNameColumnTitle=Product

#XTIT: The title of the column containing the product's supplier name
tableSupplierColumnTitle=Supplier

…
공급업체 컬럼 제목에 대한 새 i18n 속성을 추가합니다.
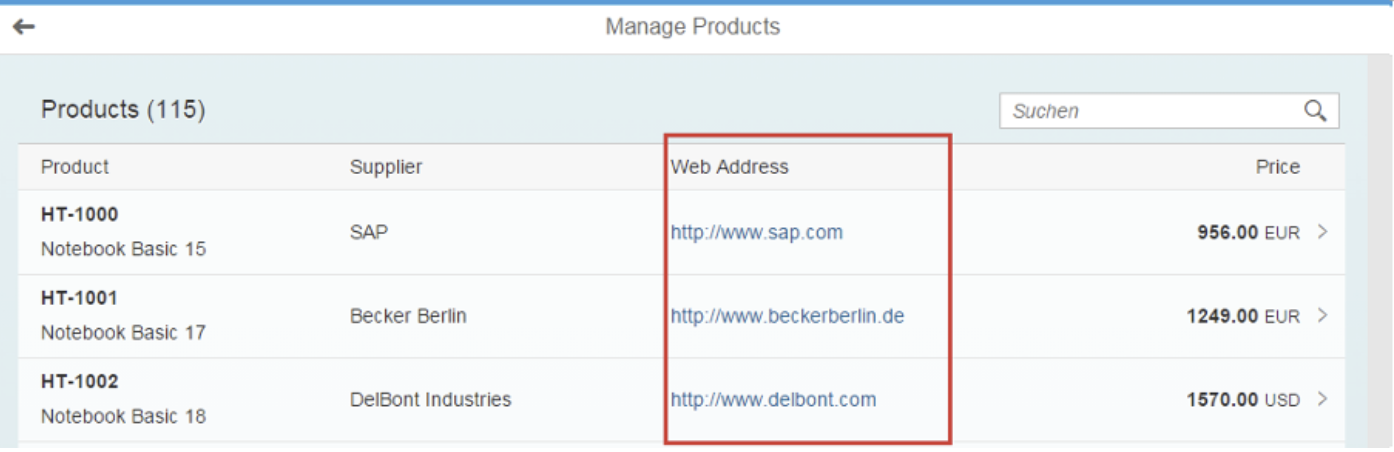
4.공급업체 웹 주소에 대한 컬럼 추가
이제 공급업체의 웹 주소를 링크로 표시하는 두 번째 컬럼을 추가합니다.
webapp/view/Worklist.view.xml
<Table … >
				…
				<columns>
					<Column id="nameColumn">
						<Text text="{i18n>tableNameColumnTitle}" id="…"/>
					</Column>
					<Column
						id="supplierNameColumn"
						demandPopin="true"
						minScreenWidth="Small">
						<Text text="{i18n>tableSupplierColumnTitle}"/>
					</Column>
					<Column id="webAddressColumn"
						demandPopin="false"
						minScreenWidth="Tablet">
						<Text text="{i18n>tableSupplierWebAddressColumnTitle}"/>
					</Column>
					<Column id="unitNumberColumn" hAlign="End">
						<Text text="{i18n>tableUnitNumberColumnTitle}" id="…"/>
					</Column>
				</columns>

				<items>
					<ColumnListItem
						type="Navigation"
						press="onPress">
						<cells>
							<ObjectIdentifier
								title="{ProductID}"
								text="{Name}"/>
							<Text text="{SupplierName}"/>
							<Link
								text="{ToSupplier/WebAddress}"
								href="{ToSupplier/WebAddress}"
								target="_blank"/>
							<ObjectNumber
								number="{
									path: 'Price',
									formatter: '.formatter.numberUnit'
								}"
								unit="{CurrencyCode}"/>
						</cells>
					</ColumnListItem>
				</items>
			</Table>
- 테이블의 컬럼 집계에 컬럼 추가하기
- ObjectListItem의 셀 집계에 링크 컨트롤을 추가합니다. 텍스트와 href를 ToSupplier/WebAddress 경로에 바인딩합니다. ToSupplier/ 접두사는 OData 메타 모델에서 다른 객체로 이동하는 것을 나타냅니다.
<Table
				id="table"
				width="auto"
				class="sapUiResponsiveMargin"
				items="{
					path: '/ProductSet',
					sorter: {
						path: 'ProductID',
						descending: false
					},
					parameters: {
						expand: 'ToSupplier'
					}
				}"
				noDataText="{worklistView>/tableNoDataText}"
				… >
ToSupplier 탐색 속성에 대한 확장 매개 변수를 사용하여 테이블의 항목 집계를 확장합니다.
이를 통해 공급업체 데이터는 제품에 대한 첫 번째 서비스 요청에 이미 포함되며 추가 요청은 필요하지 않습니다.
webapp/i18n/ i18n.properties
…

#~~~ Worklist View ~~~~~~~~~~~~~~~~~~~~~~~~~~

…

#XTIT: The title of the column containing the ProductID of ProductSet
tableNameColumnTitle=Product

#XTIT: The title of the column containing the product's supplier name
tableSupplierColumnTitle=Supplier

#XTIT: The title of the column containing the product's supplier web address
tableSupplierWebAddressColumnTitle=Web Address

…
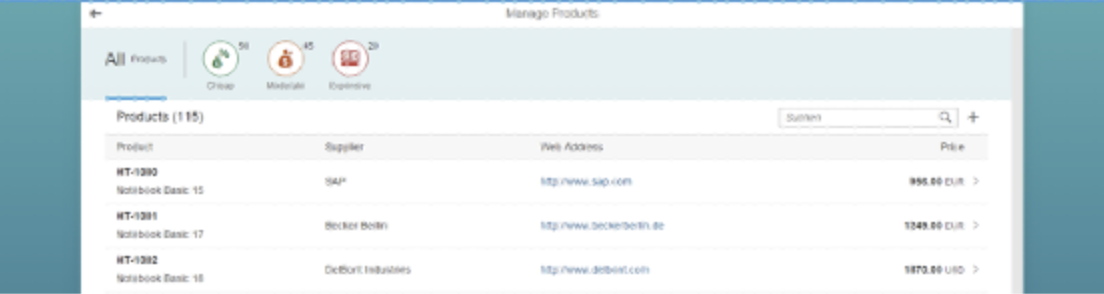
5. Chrome으로 반응성 테스트
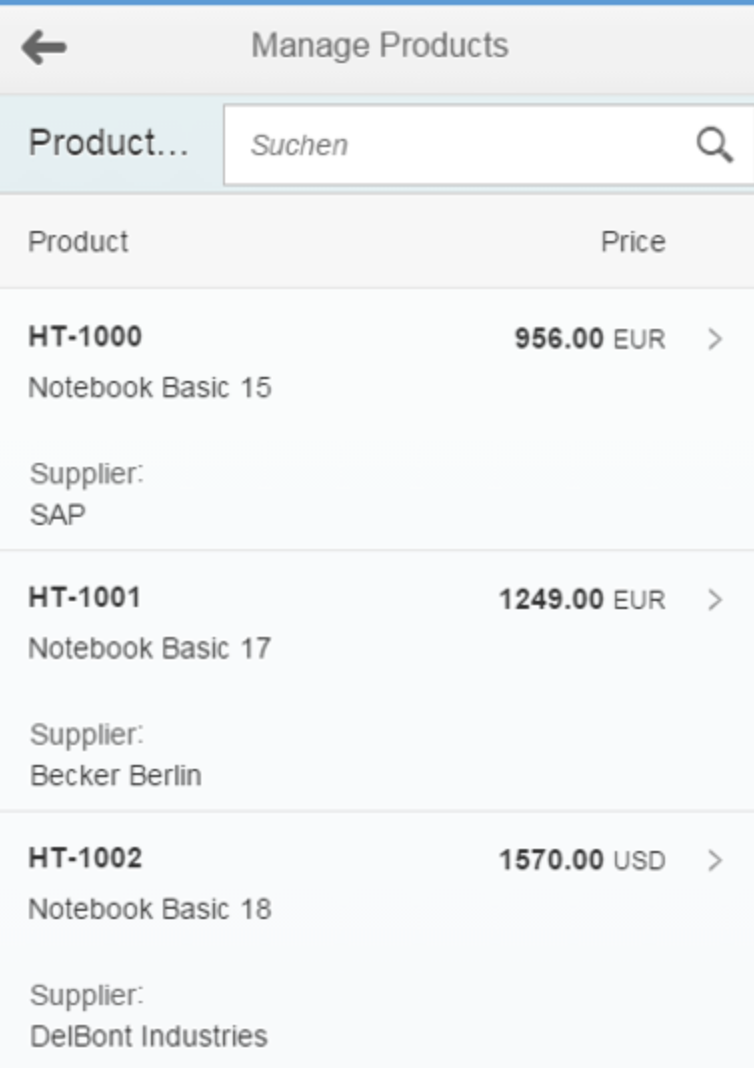
sap.m.Table 의 반응성은 브라우저 창의 폭을 변경하여 가장 쉽게 테스트할 수 있습니다.
1.Chrome 브라우저에서 응용 프로그램을 실행하고 창을 최대화합니다.
2. 모든 열이 표시되고 UI가 특정 너비 이상으로 커지지 않는지 확인합니다. 나머지 공간은 더 어두운 배경색으로 채워져 있습니다.
3. 브라우저 창의 폭을 점진적으로 줄입니다.
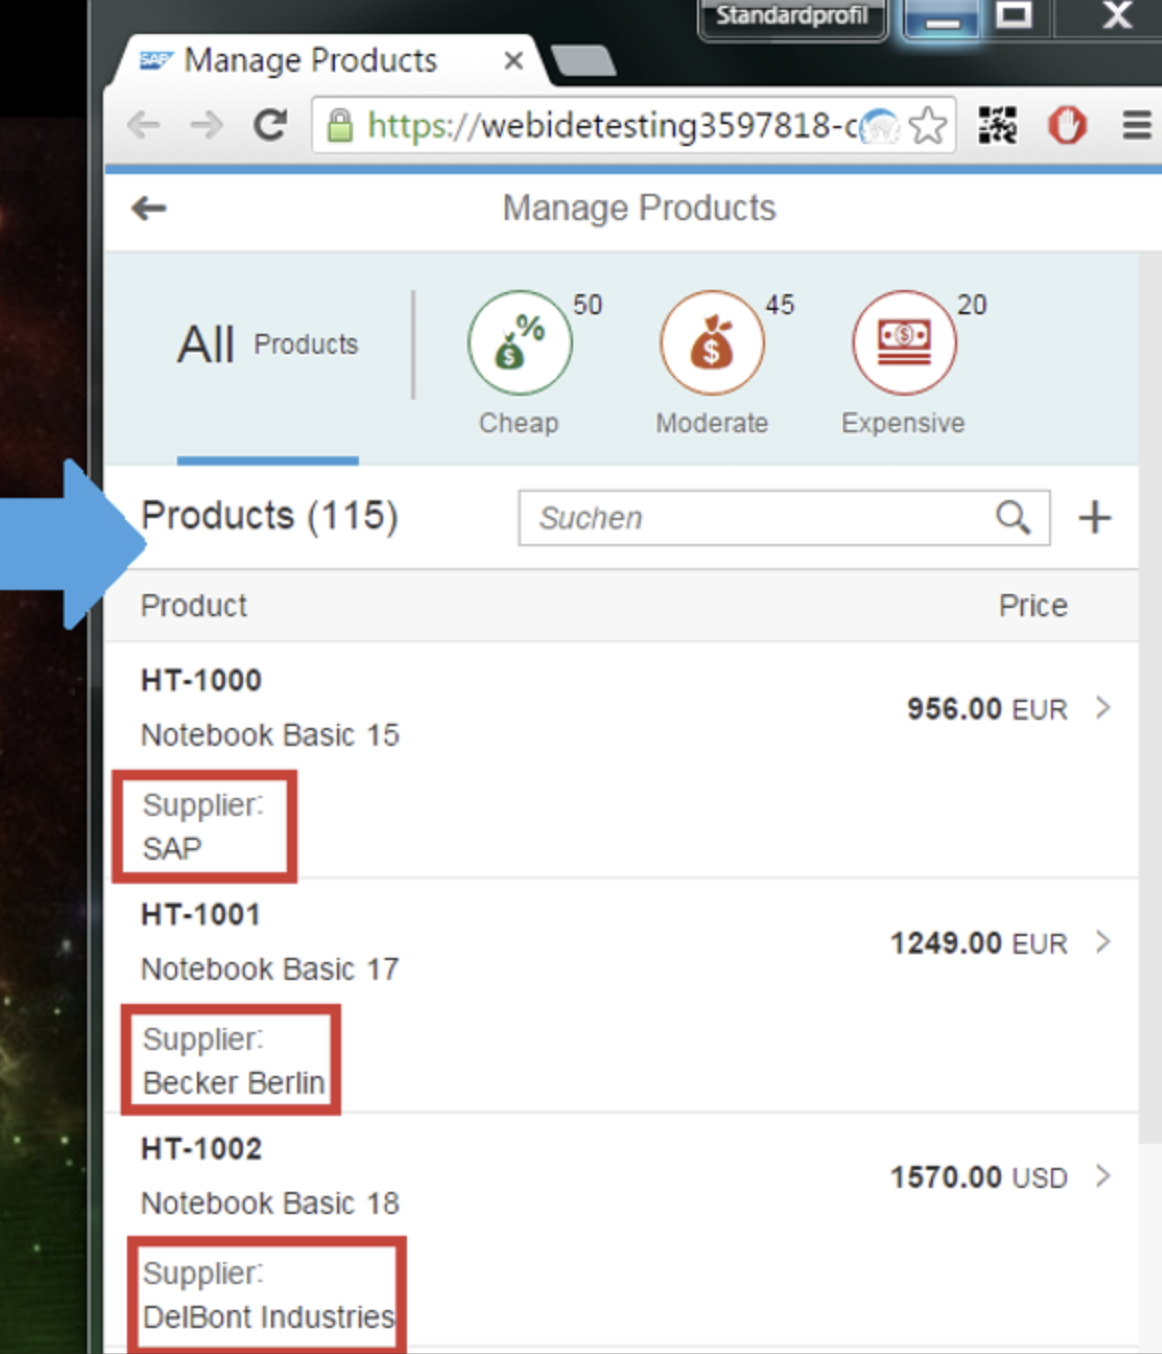
4. 특정 임계값에서 2개의 열이 사라지는지 관찰합니다. 공급자는 이제 "popin"으로 표시됩니다. 웹 주소는 숨겨지게 됩니다.
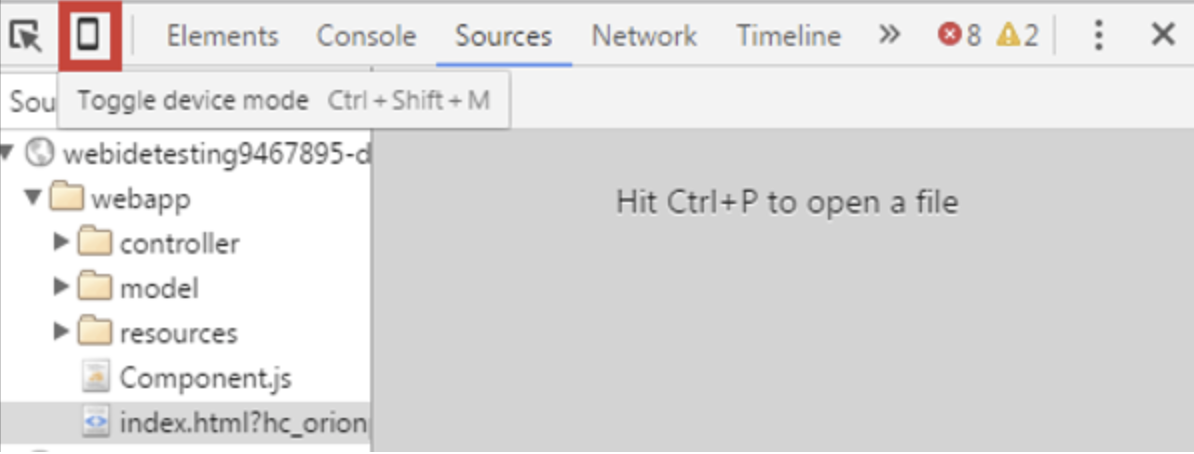
5. Chrome 브라우저에서 응용 프로그램을 실행하고 F12 키를 눌러 개발자 도구를 엽니다.
6. 도구 모음의 왼쪽 상단 모서리에 있는 작은 아이콘을 눌러 장치 모드를 전환합니다.
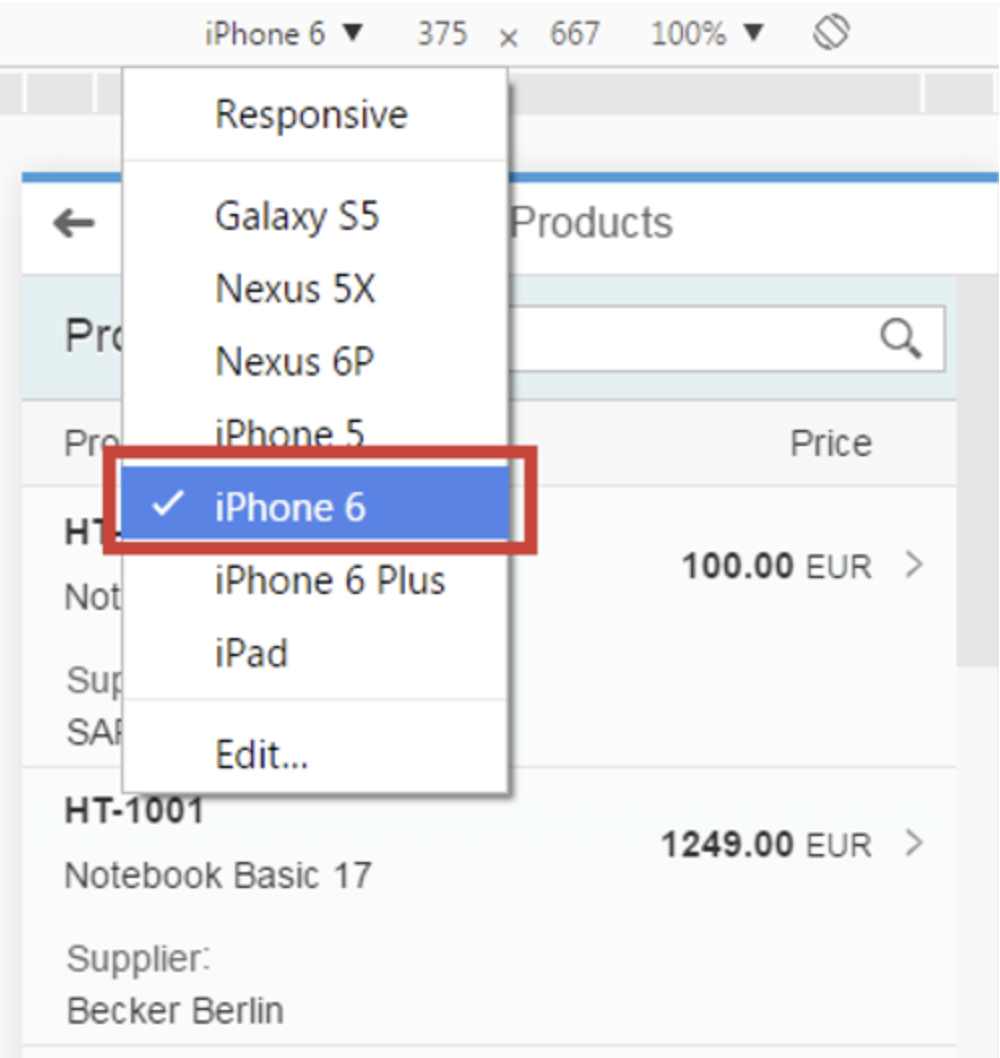
7. 기기를 Apple iPhone 6로 설정합니다.
8. 공급업체 열이 각 행에 "팝핀"으로 표시되는지 확인합니다.
9. 웹 주소 열이 숨겨져 있는지 확인합니다.

10. 응용프로그램의 브라우저 탭을 새로 고칩니다.
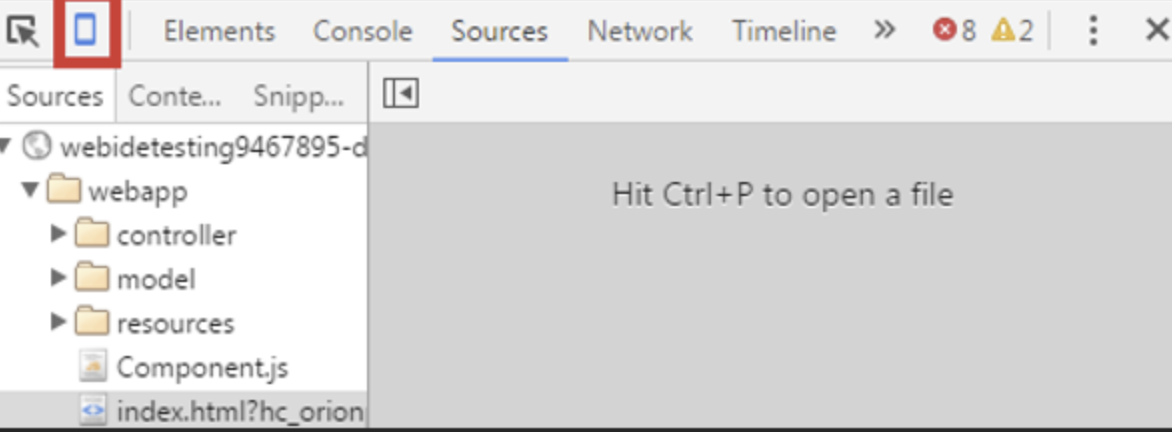
11. 장치 모델 전환 아이콘을 다시 눌러 장치 모드를 종료합니다.
6.SAP Web IDE를 통한 반응성 테스트
이번 단계에서는 다양한 화면 해상도와 장치에서의 상황을 시뮬레이션할 수 있는 SAP Web IDE의 테스트 툴을 사용하여 애플리케이션의 반응성을 테스트할 것입니다.
1.Manage Products 폴더를 선택합니다.

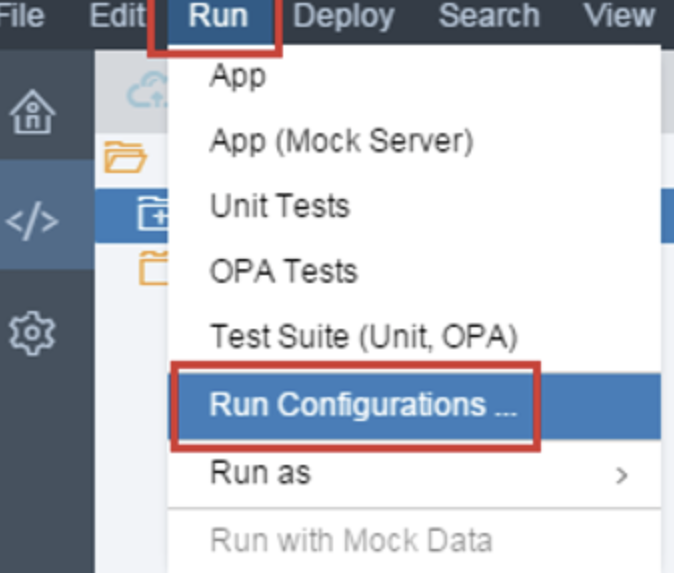
2. 실행 메뉴를 엽니다.
3. 구성 실행을 선택합니다.
4. 구성 앱을 선택합니다.
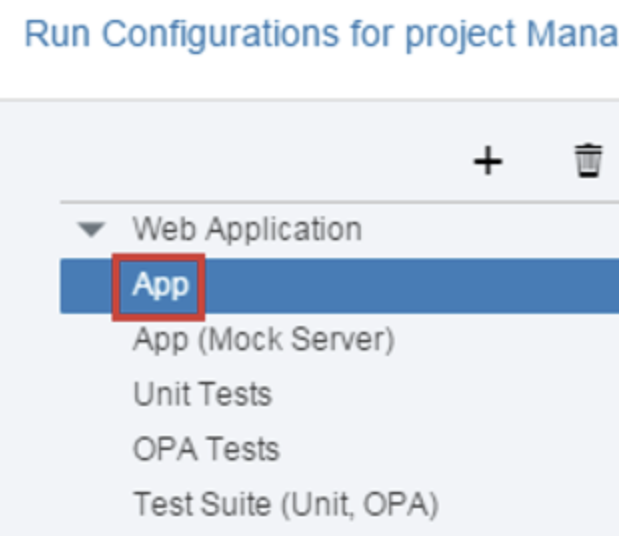
5. 일반 탭에서 미리보기 모드를 프레임 포함으로 설정합니다.

7. 저장 후 실행 버튼을 누릅니다.

8. 페이지 상단에 "작은" 화면 크기가 선택되어 있는지 확인합니다.
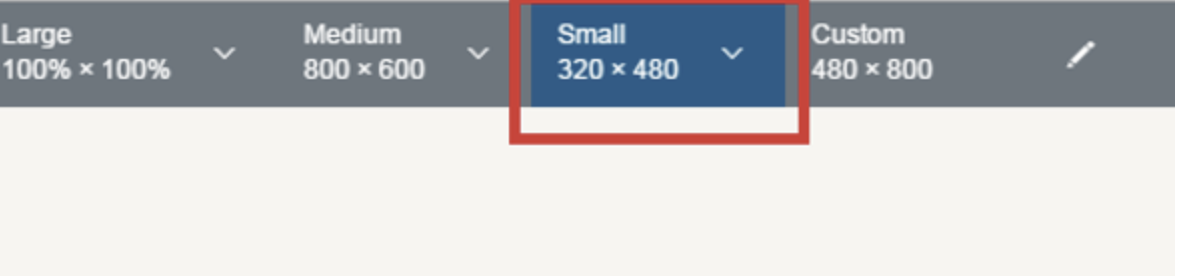
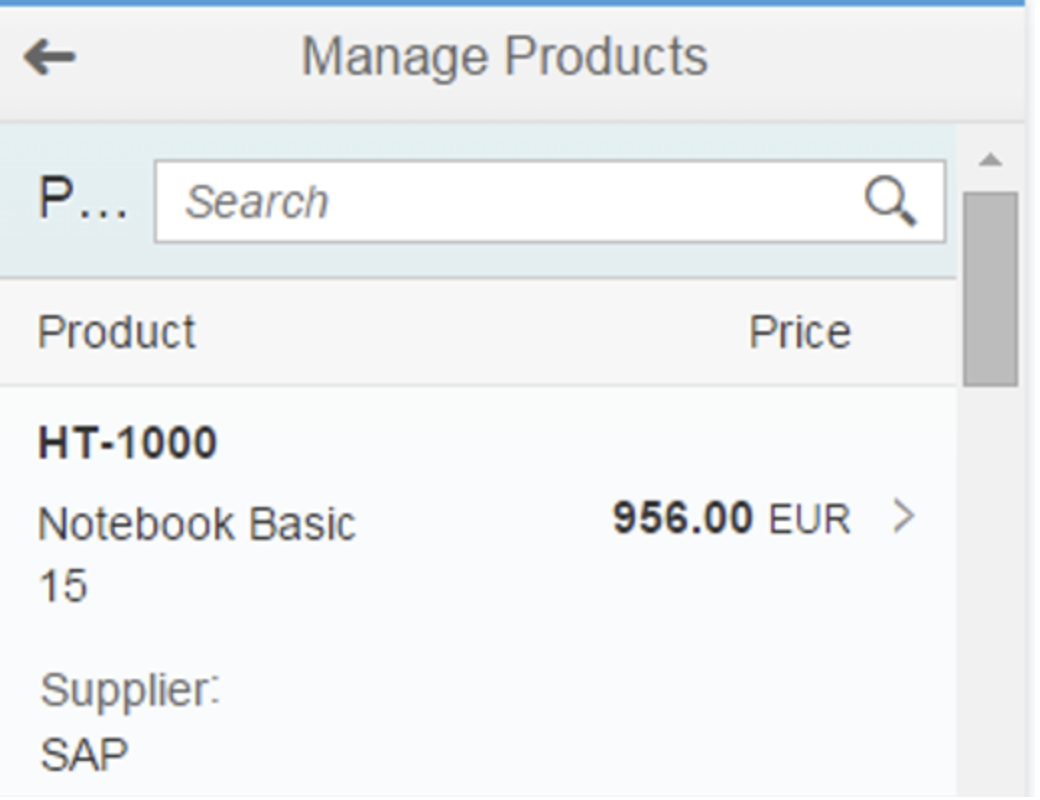
9. 공급업체 열이 각 행에 "팝핀"으로 표시되는지 확인합니다.
10. 웹 주소 열이 숨겨져 있는지 확인합니다.
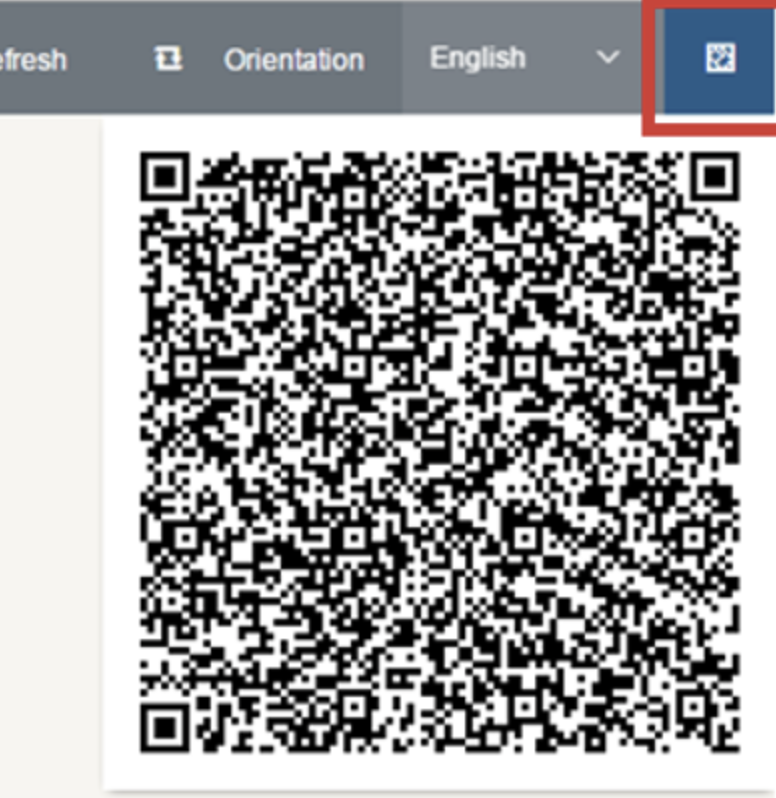
- 선택 사항: 오른쪽 상단 모서리에 있는 QR-Code 아이콘을 클릭합니다.
- 스마트폰으로 표시된 QR 코드를 스캔하고 웹 브라우저로 응용 프로그램을 실행합니다.
- 이전글SAP UI5 Week 3 - Unit 3. 퀵필터 추가하기 21.09.15
- 다음글SAP UI5 Week 3 - Unit 1. 템플릿 사용하여 앱 개발하기 21.09.15
댓글목록
