SAP UI5 Week 2 - Unit 6. OData 사용하기
페이지 정보
본문
Week 2 - Unit 6. OData 사용하기
목차
- 디버깅을 위한 배치 프로세싱 관리
- 관련 정보를 사용해 추가 기능 구현하기
1. 디버깅을 위한 배치 프로세싱 관리
이번 유닛에서는 OData에 대한 호출이 어떻게 일어나는지 살펴보기 위해 배치 프로세싱을 종료해보겠습니다.
Component.js에 다음과 같은 코드를 추가하십시오.
sap.ui.define([
	"sap/ui/core/UIComponent"
], function (UIComponent) {
	"use strict";

	return UIComponent.extend("opensap.myapp.Component", {

		metadata : {
			manifest: "json"
		},

		init : function () {
			// call the init function of the parent
			UIComponent.prototype.init.apply(this, arguments);

			// used only for this lessons to show the request individually...
			this.getModel().setUseBatch(false);

			// additional initialization can be done here
		}

	});
});
init function에서 setUseBatch(false)를 하게 되면 기존에 UI5가 자동으로 실행하던 배치 프로세싱을 종료시킬 수 있습니다. 이를 통해 디버깅을 보다 쉽게 할 수 있게 됩니다.
UI5가 기본으로 제공하는 배치 프로세싱의 경우 어플리케이션의 퍼포먼스를 효과적으로 향상시키고, 전반적인 속도를 빠르게 하지만, 코드의 변화를 하나씩 살펴보는 작업이 필요한 디버깅에는 불리하게 작용할 수 있습니다.
따라서 해당 코드를 통해 OData를 사용한 Application에 대한 효과적인 디버깅을 수행하십시오. 다만, 실제 Application을 사용할 때에는 배치 프로세싱을 종료시키게 되면 퍼포먼스에 악영향을 끼칠 수 있으므로 이는 디버깅 할 때만 사용하십시오.
2. 관련 정보를 사용해 추가 기능 구현하기
이번에는 Supplier에 대한 추가 정보를 OData를 이용하여 구현해보겠습니다.
App.view.xml에 다음의 코드를 추가하십시오.
<mvc:View>
…
									<List
										id="productsList"
										items="{
											path: '/ProductSet',
											parameters : {
												expand: 'ToSupplier'
											},
											sorter : {
											  path : 'Category',
											  group : true
											}
										}"
										growing="true"
										growingThreshold="5"
										growingScrollToLoad="false">
										<headerToolbar>
                        	<Toolbar>
                          		<Title text="{i18n>productListTitle}"/>
                          			<ToolbarSpacer/>
                            		<SearchField width="50%" search="onFilterProducts"/>
                          </Toolbar>
                       </headerToolbar>
										<items>
											<ObjectListItem
												title="{Name}"
												number="{Price}"
												numberState="{= ${Price} > 500 ? 'Error' : 														'Success'}"
												intro="{ProductID}"
												press="onItemSelected"
                          		type="Active">
												<firstStatus>
													<ObjectStatus text="{
														parts: [
															{path: 'WeightUnit'},
															{path: 'WeightMeasure'}
														],
														formatter : '.formatter.delivery'
													}"/>
												</firstStatus>
												<secondStatus>
													<ObjectStatus
														title="{i18n>statusDeliveryFrom}"
														text="{ToSupplier/Address/City}"/>
												</secondStatus>
											</ObjectListItem>
										</items>
									</List>
…
</mvc:View>
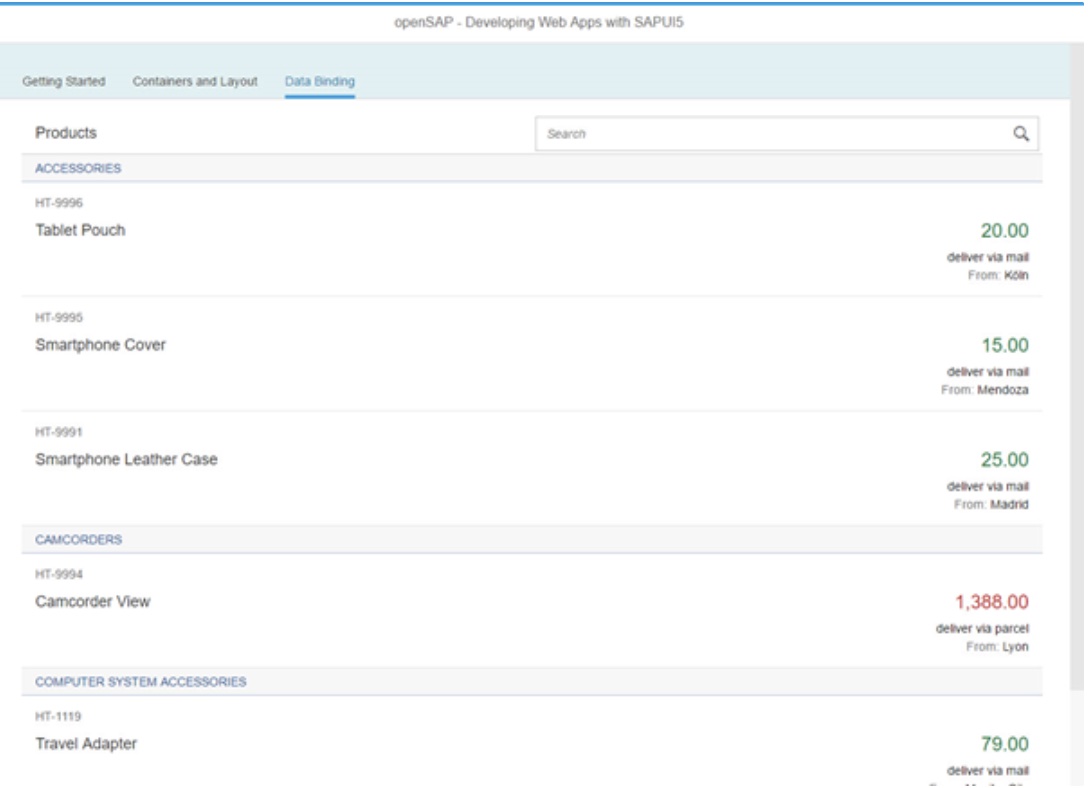
parameter에 대해 expand 코드를 사용하여 추가적인 OData를 불러옵니다. 그리고 그 불러온 데이터를 기반으로 새롭게 <secondStatus>에 정보를 추가해줍니다. 이런 식으로 OData에 추가 정보를 불러 이를 Application에 사용할 수 있습니다.
마지막으로 i18n.properties에 text 관련 정보를 입력하겠습니다.
…
# Data Binding Content
productListTitle=Products
...
statusDeliveryFrom=From
…
해당 실습을 마치고 나면 화면이 다음과 같이 나타납니다.
- 이전글SAP UI5 Week 3 - Unit 1. 템플릿 사용하여 앱 개발하기 21.09.15
- 다음글SAP UI5 Week 2 - Unit 5. Element Binding을 이용하여 추가 기능 구현하기 21.08.25
댓글목록
